Background
This help explains how to install GenHelm for the very first time. If you have already installed a previous version of GenHelm, and you are upgrading to a newer version, please visit Upgrading GenHelm.
The GenHelm installation kit is divided into three separate zip files.
- The GenHelm Application Runtime
- The GenHelm Integrated Development Environment (IDE)
- The Sakila Demonstration Site
The files you need depends on what sort of environment you are setting up as shown here:
Installation File Sandbox Production Application Runtime ✓ ✓ GenHelm IDE ✓ ❌ Demonstration Site Optional ❌ Application Runtime
All of the applications you develop in GenHelm, as well as the GenHelm IDE, make use of components in the GenHelm application runtime. We refer to these as "system" components.
Integrated Development Environment
The GenHelm Integrated Development Environment is a web application used to develop other web applications. This is normally installed on a development server so that multiple web developers can work together on building various components of the same web application(s). Alternatively, you can install GenHelm on a stand-alone PC or Macintosh computer. If you install GenHelm on a desktop computer you can develop websites without being connected to the internet.
Demonstration Site
The Sakila demo site contains the source code (specifications) for the demo site located at www.sakilademo.com. Installing this demo site is a good idea if you are planning to build database applications using GenHelm.
Installation Overview
Prerequisites
The GenHelm IDE and applications built in GenHelm require PHP version 8.2 or higher.
Setting Up A GenHelm Development Environment
GenHelm runs as a web application so many of the steps used to set up GenHelm are similar to those you would perform when configuring any website. To install GenHelm you need to:
- Install the GenHelm Application Runtime (system components)
- Install the GenHelm IDE
Installing the GenHelm Application Runtime
These steps should be followed if you are preparing to install the GenHelm IDE or if you are setting up a production server intended to host websites developed in GenHelm.
StepRemote
ServerLocal
PC or MacInstall an HTTP server and PHP environment ✓ ✓ Configure default document and error document ✓ ✓ Update your php.ini modules if necessary ✓ ✓ Register a domain and point it to your sandbox server ✓ ❌ Create system Subdomain ✓ ❌ Download and unzip the system files ✓ ✓ Install any required third-party components ✓ ✓ Transfer or copy the files to your web server ✓ ✓ Configure your server ✓ ✓ Test your installation ✓ ✓ Let's review these steps in detail.
Install an HTTP Server and PHP Environment
If you don’t already have an HTTP server and PHP environment installed, you will need to install these before installing GenHelm. For convenience you should consider installing a prepackaged solution stack that includes PHP and MySQL. For example, LAMP for Linux environments, XAMPP or WAMP for Windows installations or Homebrew for Mac installations.
The earliest PHP version needed to run GenHelm is PHP 8.2 so make sure your environment supports PHP version 8.2 or higher.
We recommend using Apache as your HTTP server however other HTTP servers can also be configured to run GenHelm. If you wish to host GenHelm on a PC or Mac, without a separate HTTP server, you can launch PHP's Built-in web server from the command line as shown here (after completing the installation).

In this example, we are listening on port 8080 so you would need to launch GenHelm from the URL:
http://localhost:8080/genhelm/
Configure Default Document and ErrorDocument
One of the great features of GenHelm is that it can support folder based (SEO friendly) URLs without any effort. To make these work you just need to define the following setting:
ErrorDocument 404 /index.phpThe required ErrorDocument setting instructs the Apache webserver to call the index.php file for any request that does not map to a physical file. This setting is part of the default .htaccess file installed by GenHelm into your web server’s document root folder. Alternatively, you can apply this setting directly within your httpd.conf file.
To allow this setting within the .htaccess file, the AllowOverride setting must permit the .htaccess file to override the settings defined in httpd.conf. AllowOverride could be set to FileInfo or All to support overriding within .htaccess as shown here:
<Directory "/home/yourdocumentroot">
  AllowOverride FileInfo
</Directory>
The Apache configuration also needs to ensure that the PHP handler is loaded and defaults to loading index.php. For example, if running PHP version 7.4 you would add the following:
If you are running PHP 8 the directives will look something like the this:LoadModule php7_module "/usr/lib/apache2/modules/libphp7.4.so" <IfModule php7_module> DirectoryIndex index.php index.html AddHandler application/x-httpd-php .php </IfModule>LoadModule php_module "/usr/lib/apache2/modules/libphp8.0.so" <IfModule php_module> DirectoryIndex index.php index.html AddHandler application/x-httpd-php .php </IfModule>These directives can go directly into the httpd.conf file however it may be preferable to create a separate php.conf file that is loaded via an include line within the httpd.conf such as the following:
Include "/etc/apache2/conf.modules.d/*.conf"This is done to make it easier for server managers like cPanel to perform automated editing of httpd.conf.
Configuring PHP
GenHelm requires that certain PHP extensions be enabled in order to use all of the GenHelm features. Review your php.ini file and make sure the following extensions are uncommented. Note that MySQL/PostgreSQL are not required to run or use GenHelm itself; however, you will need these (or other database configurations) if you plan to build database applications in GenHelm.
- pdo_mysql for MySQL database connections
- pdo_pgsql for PostGre database connections
- xml for working with xml files
- ftp for FTP support
- pear for installing PEAR libraries
- iconv for converting Unicode strings
- mbstring for Multibyte string handling (mb_* functions)
- gd2 for generating images
- curl for interfacing with Curl
- openssl for encryption
- php_zip for using ZipArchive (PHP includes this automatically prior to PHP 8.2)
For most installations, these are the only extensions that you need to include:
extension=curl
extension=gd
extension=mbstring
extension=openssl
extension=pdo_mysql
extension=php_zip
We also recommend the following PHP settings:
expose_php = off
Security related; this prevents exposing the running php version in the http response header.
max_input_vars = 1000
This setting controls the number of GET/POST/COOKIE variables to accept.
memory_limit = 32M
Controls the memory that will be made available to each PHP process. This is particularly important if you plan to generate large images.
post_max_size = 8M
Setting controls the maximum size of POST requests to accept.
upload_max_filesize = 8M
This may need to be increased if you are planning to use GenHelm to upload videos or other large files to your web server.
allow_url_fopen = off
This limits fopen to local files only for security reasons.
Establish a Sandbox Domain
This step is not required if you are installing GenHelm on a local Windows PC or Macintosh computer. If you are installing GenHelm on a public server you will have to register a domain which can be used to access your sandbox environment. After acquiring a domain, you will need to log into your Domain Registrar to update the DNS records so that the sandbox domain points to your server.
If you are using a web hosting control panel (like cPanel or Plesk), the easiest way would be to just point the NS record to your server's name servers that were assigned to you by your hosting provider.
The nameservers usually look something like ns1.nameserver.com and ns2.nameserver.com.
Using your server's name servers is convenient since the web hosting control panel will automatically update your domain's DNS records whenever you add or remove subdomains.
If you don't have a web hosting control panel (for example, if you are using a VPS), you will need to define the required A records on your Domain Registrar's control panel.
As an example, if you are using "sandbox.com" as your sandbox and your webserver is running at 192.168.1.1, the DNS records will look something like this:
sandbox.com. A 192.168.1.1
www.sandbox.com. CNAME sandbox.com (optional)The first record points the A record of the root domain (sandbox.com) to your server. The second line creates an optional canonical name (CNAME) record for the "www" subdomain that points back to the root domain. You can skip adding this line if you do not want to access your sandbox via its "www" address.
Define system Subdomain
If you are installing GenHelm on a remote server, you will need to define a subdomain named system.
Download and Unzip the Installation Files
You require a license key to download the GenHelm installation files. If you don't have a license key, you can purchase GenHelm using our Paid Subscription. If you already have a license key, you can download GenHelm here. Download all three installation zip files in case you need them all.
For this part of the installation, you will be using the installation file with system in its name. After you have downloaded the zip files you can right-click the system zip folder and choose "Extract All..." to unzip the files or you can simply open the zip folder and use <ctrl>+a to select all of the files and then <ctrl>+c to copy the file list to the clipboard. You can then navigate to where you want to save the unzipped files and use <ctrl>+v to paste the files. If you are installing on a PC or Mac you can paste the files directly into your web server path. See below for more details on this.
Install Any Required Third-Party Components
Some of the supplied models make use of components that are not included in GenHelm's installation files. They are not included, by default, because some GenHelm's customers may not require the functionality offered so we make the installation of these components optional. These optional components are described below.
PDF Generation
Both of the optional components pertain to the generation of PDF documents from HTML pages. For example, if the website you are planning to build includes the creation of HTML invoices, you may want to be able to generate PDF versions of these invoices to email to your customers. The two frameworks for generating PDFs from HTML are linked to below:
Chances are you won't need both of these frameworks, since they each serve a similar purpose. From our experience, Dompdf seems to respect styling better than html2pdf but this may depend on the nature of the HTML being converted to PDFs. In both cases, the easiest way to install these frameworks is using Composer. After installing composer, you can invoke the command line under Windows using the Command Prompt app. You should install third-party components under the folder private_data/system/vendor as shown here:
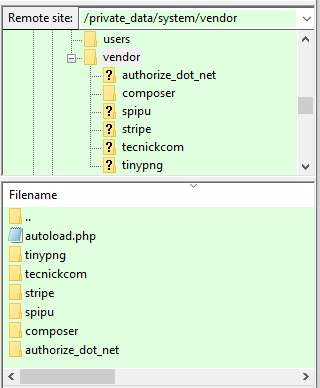
In order to install into the vendor folder, you should invoke the composer require command from the directory private_data/system as shown here
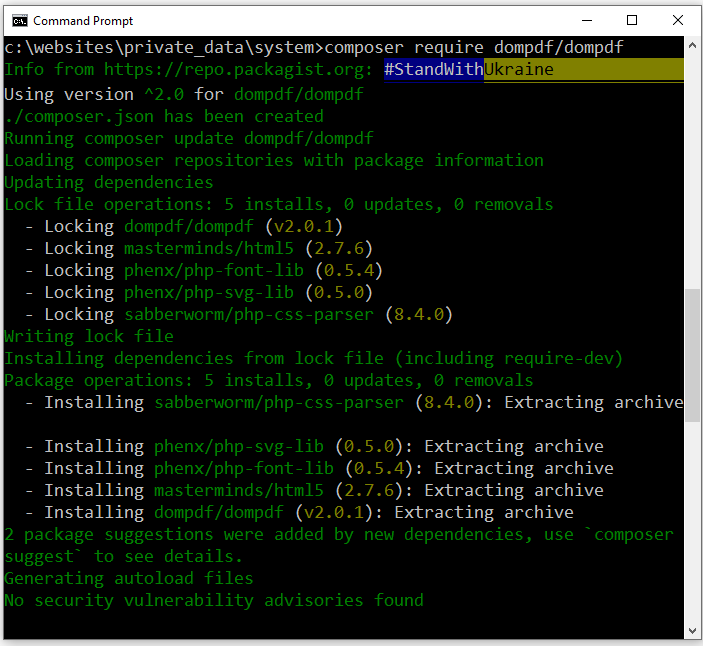
Note that the Html2Pdf framework relies on your PHP installation to be configured with allow_url_fopen set to "on", at least in cases where pages containing images are being rendered as PDFs.
Copying Files to Your Webserver
Development Server File Structure
If you are installing your sandbox on a remote server, each website you develop will be hosted as a separate subdomain. Although system is not intended to be a stand-alone website, this is installed in a separate folder which is a sibling to the website folders you will be developing. The GenHelm IDE will also be installed in a folder which is a sibling of the system folder. Here is an example of what your sandbox’s public_html folder might look like after you have created several websites:
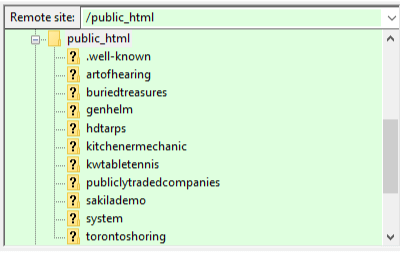
The genhelm and system folders are part of the installation process, the other folders are created to host the new websites that you build. If you are installing your sandbox on a local PC or Mac, the files will look the same however you won't need to define your site folders as subdomains.
These same folder names will also be created within the private_data folder which is a sibling of the public_html folder. The public_html folder is used to store components such as images, CSS and JavaScript that need to be accessed directly by the browser. The only PHP component that is installed under public_html is a one-line program, named index.php, that is installed in each public_html folder to launch the GenHelm Application Runtime. All other PHP classes and include code are located under the private_data folder.
Since none of the classes and private documents used within your websites are stored within the web server’s document root directory (or its subdirectories) there is no need to protect any folders on your web server.
Live Server Configuration
Within your production environment, each website you develop will normally be hosted under a separate domain. If you are using cPanel, it is most convenient to host multiple websites under a single cPanel account. This makes it easy to share the same system runtime across all of your sites. cPanel implements these non-primary domains as VirtualHosts in the apache configuration file. The GenHelm IDE is not normally installed within your production environment however the system folder must be installed as a subdomain on your production server to host the runtime environment of your live sites.
The public_html folder for the live site connected to the sandbox shown above might look something like this:
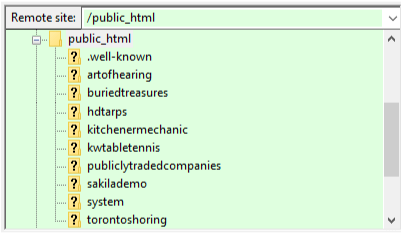
Notice that it contains the same set of folders as your sandbox except for the genhelm folder. The other main difference is that, except for system, these folders coincide with actual domains, not just subdomains. This allows your live sites to be accessed via their own unique URLs.
Installing the GenHelm Application Runtime
The first set of files you should install are those defined in the "system" zip file. These files appear as follows:
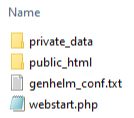
When these folders and files are copied to your http server location their position, relative to each other, must be preserved. The name of the public_html folder must agree with the name assigned to you DocumentRoot. If you are installing on a remote server you can use FileZilla or some other ftp client to copy the files.
Begin by copying the private_data folder and the webstart.php file to your web server one level above the document root directory. Next we will describe two options for establishing your document root folder.
- Using public_html as your document root folder
- Using an alternate document root
Option 1 - Using public_html as Your Document Root
If you decide to make public_html your document root you can copy this folder next to (as a sibling of) the private_data folder on your server. Here we see what your server might look like after copying these installation files:
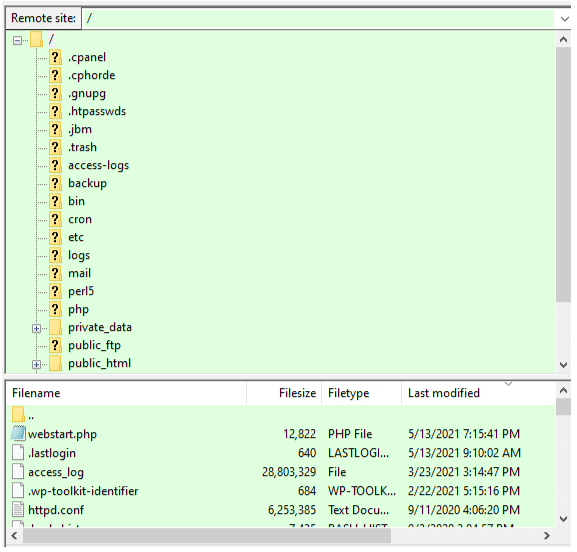
In this case, we did not need to use the genhelm_conf.txt file because this is primarily used if we want our document root folder to be something other than public_html. On the other hand, we will need to update httpd.conf to make sure the DocumentRoot directive points to our public_html folder.
Changing the Web Server’s Document Root
The DocumentRoot directive in httpd.conf must point to the folder location that will serve as your webserver’s root directory. Often Apache installations use htdocs as the default root folder. If you want to switch to using public_html you will need to edit the httpd.conf file and update the two lines similar to the following:
Change from these lines:
DocumentRoot "[server path]/htdocs"
<Directory "[server path]/htdocs">
Change to these lines:
DocumentRoot "[server path]/public_html"
<Directory "[server_path]/public_html">
You will need to restart Apache if it is already started.
Option 2 - Keeping Your Current Document Root
If you decide to keep htdocs or some other folder as your document root you will need to copy all of the files and folders that are located inside the supplied public_html folder into your document root folder. Before copying the files, review the current files in that folder to make sure that GenHelm will not replace any of the files that you want to keep. For example, if you are installing under xampp there is already a file named index.php in the root folder, start by renaming this so that you don’t overwrite it.
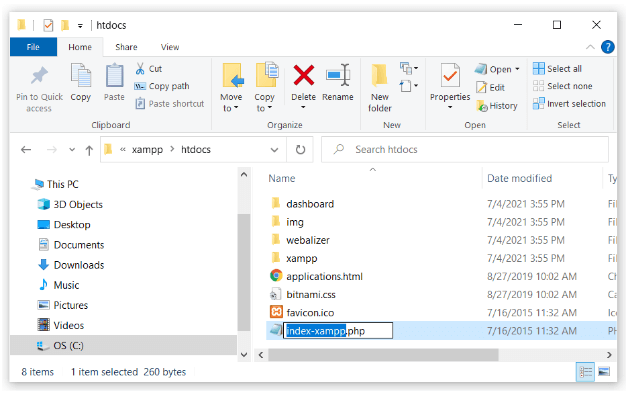
In the screen shot above we renamed the file index.php to index-xampp.php.
Now you can copy all of the contents inside the public_html into the htdocs folder. When you are finished your htdocs folder will look something like this:
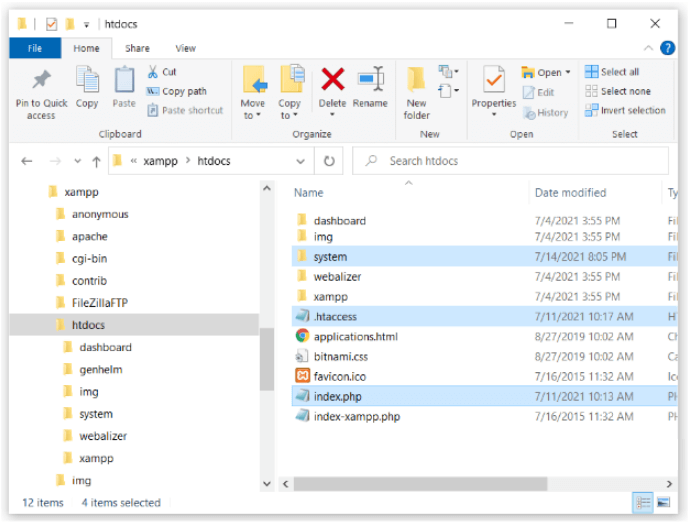
Since, in this scenario, we are not using public_html as our document root folder we need to make use of a GenHelm config file. Go up one level (above the document root). This folder should contain the private_data folder and the webstart.php.
Copy the file named genhelm_conf.txt to this folder as shown below:
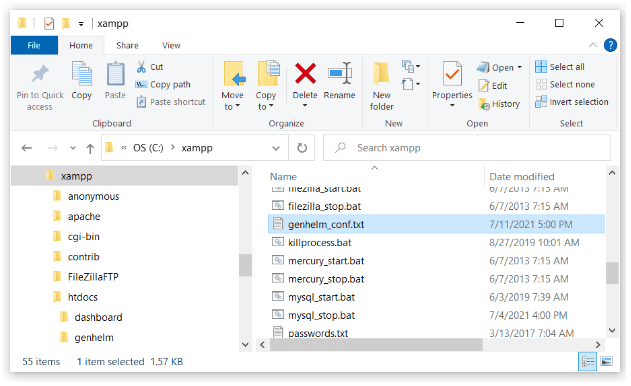
Next, rename this file to genhelm_conf.inc.
Edit the file and uncomment the PUBLIC_HTML definition and change the value in the second string to htdocs (or whatever name you used as your document root). Do not include the path to this folder. After making this change genhelm_conf.inc will look something like this:
<?php
/* Program......: genhelm_conf.inc
 * Title........: Configure GenHelm for the current environment
 * Author.......: GenHelm
 * Description
 * Uncomment any lines needed to configure GenHelm for your environment then rename
 * this file from genhelm_conf.txt to genhelm_conf.inc
*/
define ('PUBLIC_HTML','htdocs');
// define ('PRIVATE_DATA','renamed_private_data_folder');
// define ('SYSTEM_FOLDER','renamed_system_folder');
// define ('FRAMEWORK_PRIVATE_BASE','full/path/to/private_data/system');
// define ('CLASS_PATH','full/path/to/system/classes');
// define ('INCLUDE_PATH','full/path/to/system/includes');
// define ('PLATFORM','generator_subdomain_defaults_to_genhelm');
// define ('SITE_DIRECTORY','full/path/to/current/site/folder');
// define ('FRAMEWORK_SERVER','identifies_server_config_file');
//
// Required $_SERVER values
// $_SERVER['HTTP_HOST'] = 'base url without http(s)://';
// $_SERVER['REQUEST_URI'] = 'path/portion/of/url';
// $_SERVER['HTTPS'] = 'If set - default to HTTPS protocol';
// $_SERVER['REQUEST_METHOD'] = 'GET or POST';
// $_SERVER['HTTP_REFERER'] = 'used to solve same site cookie browser bug';
// $_SERVER['DOCUMENT_ROOT'] = 'full/path/to/sites/root/folder';
// $_SERVER['SERVER_NAME'] = 'used-to-determine-if-localhost';
// $_SERVER['SERVER_ADMIN'] = 'determines-server-name-if-FRAMEWORK_SERVER-not-defined';
// $_SERVER['HTTP_UPGRADE_INSECURE_REQUESTS'] = 'if set force https';
// $_SERVER['QUERY_STRING'] = 'parameter portion of url';
// $_SERVER['SCRIPT_URI'] = 'used-by-db-blog';
?>
Save this file after making your changes.
Configuring Your Servers
Each server that runs GenHelm or GenHelm-generated applications requires a configuration file. This file supplies the runtime with important information pertaining to the environment it is running under. Each configuration file is a small PHP program that resides in the folder private_data/system/config.
As part of the installation, the following three template files are installed:
_environment_LIVE-SERVER-NAME.inc
_environment_SANDBOX-SERVER-NAME.inc
_environment_localhost.incThe first two files need to be renamed according to your live server master domain and your sandbox domain. For example, suppose your live server’s master domain is sitesgalore.com, the first file would be renamed to _environment_sitesgalore.com.inc
The contents of these files varies depending on which environment you are setting up so always begin with the file that corresponds to the environment you are configuring.
Let’s review the settings in these files:
$this->set_environment(value);
This conveys the environment that GenHelm is running in. Set value to one of the following:
0 - Production/Live Website
1 - Sandbox
2 - Development (localhost)ini_set( 'display_errors', 'value');
The value field is normally set to 0 for production environments and 1 for non-production.
$this->set_noindex_domain('value');
This is used to prevent certain domains from being indexed. This statement can be repeated for each domain that you do not want to be indexed by search engines. In most cases, this is used to prevent indexing of the master domain. For instance in our sitesgalore.com example, since this is a master domain which hosts many sites as add-on domains these add-on domains can theoretically be accessed as subdomains of the master domain. When this happens we want to no-index the pages to prevent duplicate content. This would be done by adding the config line:
$this->set_noindex_domain('sitesgalore.com');$this->set_framework_domain('value');
This setting needs to point to the server’s public system folder. For example:
$this->set_framework_domain('https://system.sitesgalore.com');$this->set_license_key('value');
This setting must be specified in your sandbox or localhost config files. This is used to set the license key that was assigned to you when you purchased your GenHelm subscription.
$this->set_config('google','adsense_id','value');
If you host sites that run Google display network ads to generate ad revenue use this setting to supply the id of your adsense account. This will be used as a default but can be changed for individual sites.
$this->set_config('google','map_api_key','value');
If you plan to host sites that render dynamic Google maps you will require a map api key. This value is used to supply the default API key.
$this->set_config('mail','return_path','value');
If you will be generating and sending emails from your server use this setting to set the return email address to be used when emails fail to be delivered. Generally this address will coincide with your master domain. For example:
$this->set_config('mail','return_path','mail@sitesgalore.com');$this->set_config('mail','mail_archive','value');
If you want to save a blind copy of every email sent from your server, across all hosted sites, enter the email address to be BCCed here. For example:
$this->set_config('mail','mail_archive','archive@sitesgalore.com');$this->set_config('mail','mailform_sender','value');
Since all email is sent via the master domain, you must establish an email address on this domain to be designated as the sending address. For example:
$this->set_config('mail','mailform_sender','sender@sitesgalore.com');Without this, most of your emails will be flagged as spam by the receiving mail server. Note that the email sender is not the same as the return address. Even though your sender email is an address belonging to your master domain, when user’s reply to email sent by your server the reply will be sent to a return address associated with the website that caused the email to be sent.
$this->set_server_timezone('value');
Enter the PHP timezone associated with your server. Supported timezones can be found at https://www.php.net/manual/en/timezones.php. You can remove this statement from the config file if you want to use the default timezone set in your php.ini file
$this->set_server_password('value');
This password is used to encrypt sensitive information used by your server. Enter a random string of about 40 characters consisting of upper and lower case characters, numbers and symbols. Be sure to escape single quote characters using \’.
$this->set_encrypted_ftp_user('value');
This field cannot be set correctly until after GenHelm has been successfully installed. You will need to copy the config file to the server without this value set and then update it later after setting this value.
$this->set_encrypted_ftp_pwd('value');
This is set at the same time as the encrypted_ftp_user.
Most of these settings can be changed at a later time. At this time the two most important settings are the sandbox domain and the server password. If you are using an editor such as Notepad or Notepad++, all of the domain references can be changed using a replace command such as the following:
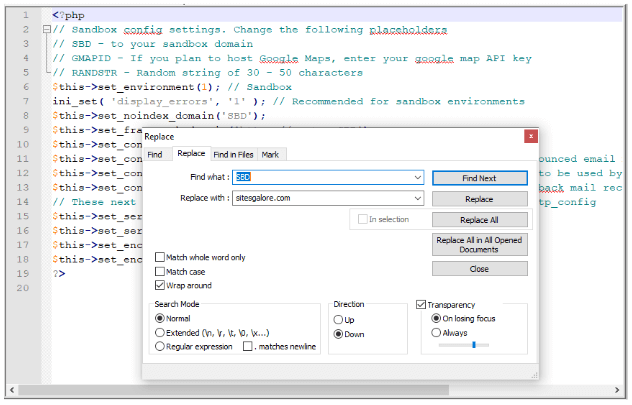
After renaming and updating these config files, save them locally. If you installed GenHelm on a remote server you will need to FTP the config file to the private_data/system/config folder.
Test Your Installation
At this point, if you have not started your web server, start this now.
If you have installed the GenHelm runtime on a remote server, try loading the url:
http://system.[your-sandbox-domain]/sysadmin/hello-world
You should see a page like this:

If you installed on a local PC or Mac the URL should be:
http://localhost/system/sysadmin/hello-world
If the hello-world page does not load you will need to diagnose the problem before proceeding to the next steps.
If the hello-world page loads successfully you can proceed as follows:
- If you are installing on a production server you have completed all of the steps and your server is ready to start hosting GenHelm developed sites.
- If you are installing on a local PC or a sandbox server you can proceed to install the GenHelm IDE.