If you landed here from our help on working with text files you have learned how GenHelm can build fairly sophisticated websites without the need for a database. In some cases you might want to start out using text files to store certain data and then transition over to database tables after the traffic to your site has expanded to the point where you need to manage more data. In this help we repeat a similar process to what was covered in the previous help except, this time, we will be storing our payment records in a database.
Creating Your Database Tables
We won't go too deep into how you create or design your database since this is outside of the scope of this help. Here we have created a simple table in MySQL Workbench to store payment information.
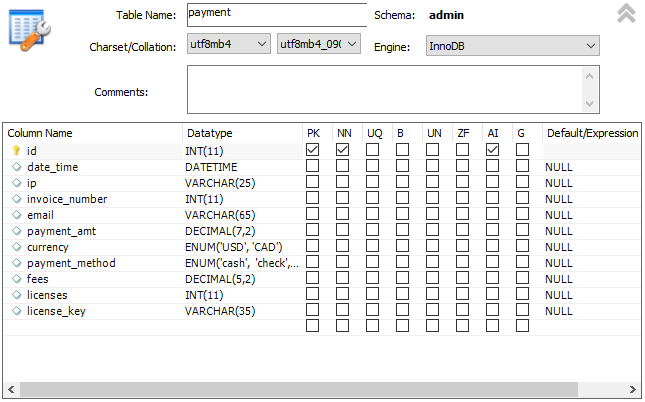
This table differs a little bit from the columns we defined in our text file example. The main difference is that we combined the separate date and time fields into a single date_time column.
Configuring GenHelm to Work With Databases
Two models are used to set up and configure database schemas. These models will generally only be used once when you first define a new schema. These models are db_config and schema. Please follow the links for these models to learn more about configuring your database.
Setting a Default Schema
If your site mainly works with one schema you can set this within site settings to be used as a default schema.

Creating the payment Object
We will use the db_object model to create a PHP class that encapsulates access to the payment table we defined above. We start by entering the "e db_object" command.
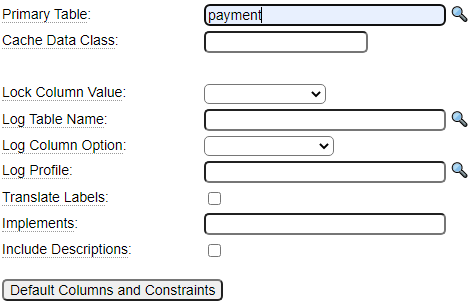
To get started you just need to type in your table name and click the button to generate Default Columns and Constraints. The db_object_model accesses MySQL's information_schema to look up all the field names so that you don't have to enter these by hand.
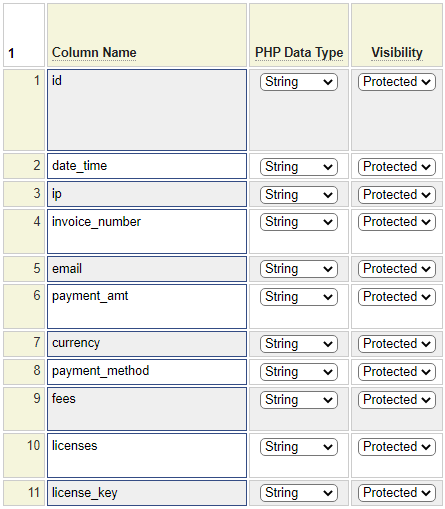
You can see that each column in the table becomes a property of the object that can be retrieved (using the get method) or assigned (using the set method). That's all we need for now so we can just go ahead and stow this class using the name payment.
Generating Test Data
In order to compare this process with what we learned about creating test data for our text file example, let's also use the custom model to create test records in our payment table. To do so we simply call the set methods of all of the payment object's properties and then call the object_insert method to store each payment as shown here.
// Require the number of inserts to be supplied in the query string
$test_records = $this->site->parameters->get_required_parameter('rows','integer');
$payment_object = $this->site->create_object('payment','',false,'db_object');
$payment_object->initialize(); // Call this once after instantiating
$payment_object->begin_transaction(); // Start a new transaction
//
// Define some valid values, we will pick these randomly
$currency = array('USD','CAD');
$method = array('cash','credit_card','check','wire');
$stored = 0;
$response = '';
for ($i = 1; $i <= $test_records; $i++) {
	// Populate the payment object values
	$value = rand(1,999).'.'.rand(1,999).'.'.rand(1,999);
	$payment_object->set_ip($value);
	$payment_object->set_invoice_number($i + 200500);
	$value = 'name'.rand(1,20).'@example.com';
	$payment_object->set_email($value);
	$payment_object->set_payment_amt(round(rand(5000,50000)/97,2));
	$payment_object->set_currency($currency[rand(0,1)]);
	$payment_object->set_payment_method($method[rand(0,3)]);
	$payment_object->set_fees(rand(100,999)/100);
	$payment_object->set_licenses(rand(1,100));
	$value = $this->site->dollar_function('random_str',20,25);
	$payment_object->set_license_key($value);
	// Store the next payment
	if ($payment_object->insert_object()) {
		$stored++;
	}
	else {
		// Store failed, harvest the message
		$response .= $payment_object->obtain_message();
	}
}
$convert = array(false=>'failed',true=>'succeeded');
if ($stored === $test_records) {
	// All records were stored, commit the transaction
	$outcome = $payment_object->end_transaction();
	return $stored.' payments were stored; End Transaction '.$convert[$outcome];
}
else {
	// Some records were not stored, back everything out
	$outcome = $payment_object->backout_transaction();
	return $response.'<br />'.
		$stored.' payments were stored; Backout Transaction '.$convert[$outcome];
}
Recall that the text example optionally allowed the user to pass a row value in the query string but defaulted this to 100. In this example, we are using a different method, get_required_parameter will raise an error if the requested parameter is not supplied on the query string. By default, this raises a fatal error if the required parameter is not provided however you can supply an error level such as E_USER_WARNING in parameter 3 to downgrade this to a warning.
After stowing this program on our local server as _create-test-payment-records-db, we can load the page using a url such as:

Astute readers may notice a couple of differences between the fields that are assigned in the code above and what was assigned when we were saving test data as text. These differences are:
- We don't assign a payment id field.
- We don't assign the date_time field.
Auto Increment Primary Key
The reason we don't assign the payment.id field is because this column is indicated as auto_increment in the database and we have defined a rule within the object definition as shown here:

Since auto_increment is set to always, we don't have the option of setting the id field. If this is not the behavior we want we can change this setting to auto_increment:if_zero. By doing so we would be able to supply our own value for the id field and the object would only default the id in cases where it is left empty (or zero). When supplying your own key value you must ensure that the value is available for use. If you try to store a payment using an id that is already taken you will get an error such as the following:

In this case we tried to store 3 records while supplying our own id field. The first two records failed but the third one succeeded since that key was not a duplicate. Nevertheless, since our code was written to back out all updates in the event of any failures the record that was temporarily inserted into the table was backed out as requested.
Note that, after changing the object setting to auto_increment:if_zero it is necessary to add the following line to our test data generator:
$payment_object->set_id(0); // Clear current idWithout this line, the first payment would be stored using an auto generated key. This key value is automatically copied back to the id property in case the caller needs to know what key was used to store the record. Since the id now has a value, the second insert would attempt to use this same id value (since it is non-zero). Since the supplied id value has already been used the second (and subsequent) records would be rejected and the first insert would be backed out by our back out logic. Setting the id to zero before each insert solves this problem.
Timestamp Field
All tables used by the db_object field must have a column that is used to guard against intervening updates. When configuring the db_object model we designated the date_time field for this purpose as shown here:

In so doing, the payment object controls this field automatically so we don't need to assign this.
For more information about creating database object classes please refer to the db_object model help.
Creating a Search Page
Next we will use the db_table_browse model to build a page that we can use to perform payment searches. We begin by setting the table name:

We will use the defaulting feature to set the search keys by pressing the Default Browse Keys button. Unfortunately, this is not very helpful since only one key was suggested as we see here.

Generally speaking you should only search tables using fields that are defined as keys within the database. Since we did not define any keys (other than the primary key) this is the only field that was suggested as a search field. At this point we should consider going back to our database definition to decide what fields (or field combinations) would be commonly searched and designate these as keys. We used MySQL Workbench to add the following index fields:

Now if we click the button to default the search fields you can see that these keys have now been added as search candidates.

Note that it was not strictly necessary to define these search fields as indexes in the database in order to use them in your browse search. You are free to type or select any field into the search field list irrespective of its index status. If you are dealing with a large file, non-key searches will tend to be slow and use substantial resources.
Next we can click the Default Display Columns button to load all of the table columns into the display candidates list.
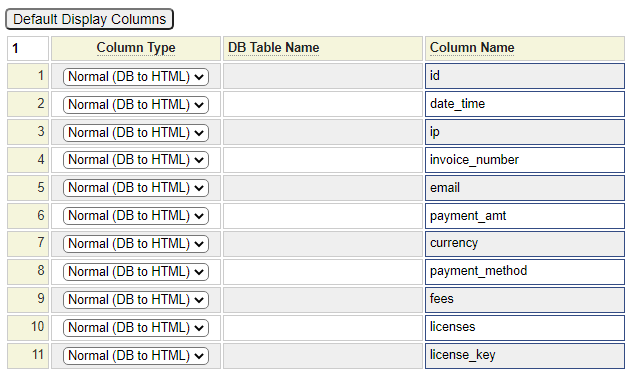
At this point we can remove any columns that we don't want to show in our search results. To change the order you would need to insert the column where you would like it to be shown and remove it from where it is currently positioned.
We recommend you stow this program using a folder such as admin or internal, etc. to group all of your back office programs within the same folder. After stowing our table browse program we can test it in a web browser as shown:
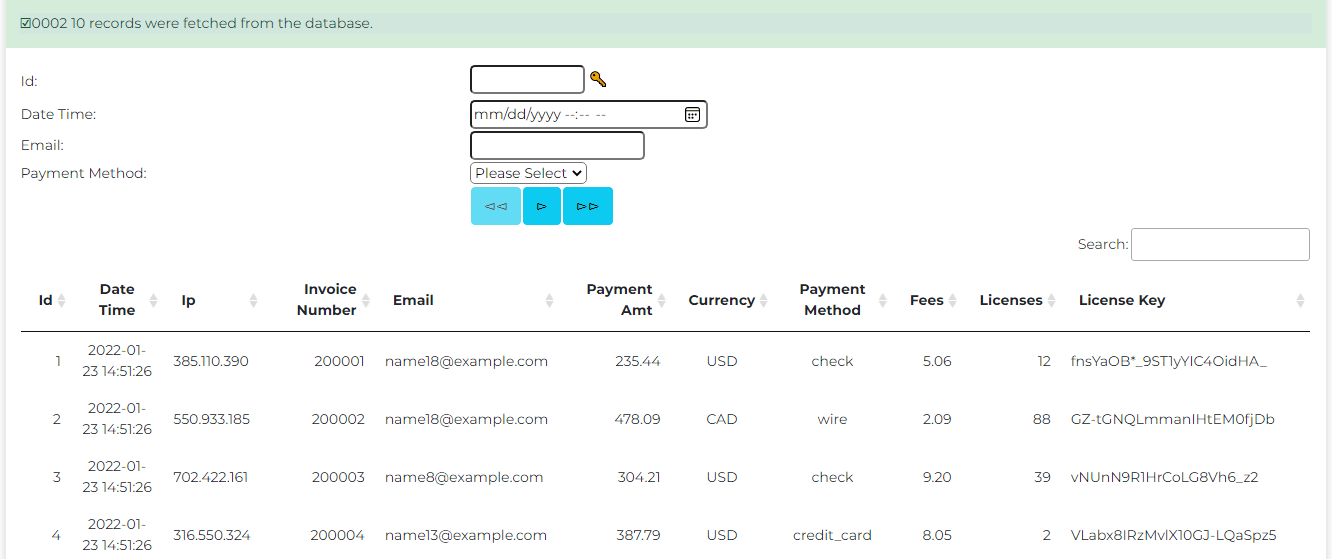
Let's make a couple of tweaks to the search fields to make this browse closer to what we built in our text search example. We will remove the id from the search fields and change the format of the date_time field to just include the date. This is set to a sort field so that users can enter a starting date and will progress through later dates when they click the >> button. We override the label on the date_time field so that this does not default to Date Time.

We also set the multiple option on payment_method so that users can filter on more than one method at a time.
When we test the screen, we are going to add debug=1 to the query string so that we can see the SQL that is generated as shown:
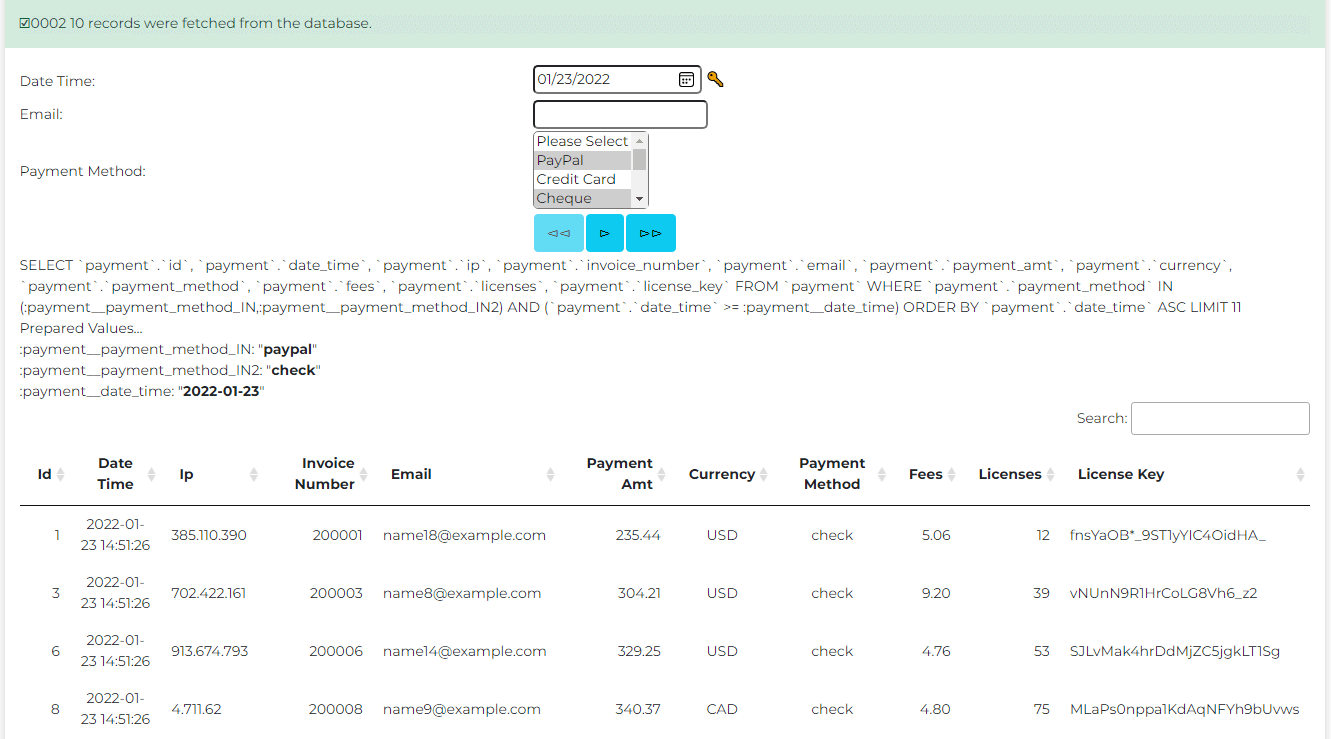
This debug feature is not permitted within production environments.
Updating Object Data
One of the advantages of using database tables rather than flat files is that it is much easier to update the data you have stored. Let's consider an example whereby users paid for their order using an old email address and they have now provided us with their new email address. We might want to go back and update the payment records to reflect the email address they are using now. Let's implement a simple form to do this.
Defining the Form
Here we see a simple form that contains the fields we will need.

We can't use the email field (defined in system) directly as our field since we need two such fields. Instead we will define two fields on-the-fly by extending the email field.
We know we are going to need a form handler so you can add this to the form even though we have not created it yet.

We will get a warning that this is missing when we stow the form but we can ignore this since we are going to create the update_payment_email form handler before we test our form.
Coding your Form Handler
The form hander needs to:
- Get the old and new email address values off the form
- Select all of the payment records that contain the old email address (and obtain the payment id for these records)
- Call the payment object for each selected id to get the object to be updated
- Set the new email property
- Call the payment object to apply the update
- At the end, commit all of the updates if there are no issues or back out any changes if there were problems
This example assumes that there won't be a large number of rows updated. If there could be hundreds of rows that match the email we are searching for it would be prudent to issue several end_transaction calls, say one after each 50 updates. Here we see the code based on a single transaction:
function post() {
	// Get the list of payments that reference the former email address
	$old_email = $this->field_list['old_email']->value();
	$new_email = $this->field_list['new_email']->value();
	$dbselect = array(
	'return_format' => 'array',
	'return_column' => array('id'),
	'schema' => 'admin',
	'table' => 'payment',
	'key' => array('email'),
	'value' => array($old_email));
	$ids = $this->site->dollar_function('dbselect',$dbselect);
	if ($ids === null) {
		$this->form->assign_message('admin',1,array('payment','email',$old_email),
                                    'No :1: records were found having :2: ":3:"',__LINE__.' '.__CLASS__);
	}
	else {
		$found = sizeof($ids);
		$updated = 0;
		$payment_object = $this->site->create_object('payment','',false,'db_object');
		$payment_object->initialize(); // Call this once after instantiating
		$payment_object->begin_transaction(); // Start a new transaction
		foreach ($ids as $info) {
			$payment_object->set_id($info['id']);
			if ($payment_object->retrieve_object()) {
				$payment_object->set_email($new_email);
				if ($payment_object->update_object()) {
					$updated++;
				}
				else {
					$payment_object->transfer_your_messages_to_me($this->form);
				}
			}
			else {
				$payment_object->transfer_your_messages_to_me($this->form);
			}
		}
		if ($found === $updated) {
			// All records were updated, commit the transaction
			if ($payment_object->end_transaction()) {
				$this->form->assign_message('admin',2,array($updated,'payment'),
                                            ':1: :2: records were updated successfully.',__LINE__.' '.__CLASS__);
				return true;
			}
			else {
				$this->form->assign_message('admin',3,array($updated,'payment'),
                                            ':1: :2: records were updated but could not be committed to the database.',
                                            __LINE__.' '.__CLASS__);
			}
		}
		else {
			// Some updates failed, roll back all changes
			$outcome = $payment_object->backout_transaction();
			$convert = array(false=>'failed',true=>'succeeded');
			$this->form->assign_message('admin',4,array($found,'payment',$updated,$convert[$outcome]),
                                        ':1: :2: records were found but only :3: were updated. Backout Transaction :4:.',
                                        __LINE__.' '.__CLASS__);
		}
	}
	return false;
}
We used a post function in this example, this function gets called regardless of which button submitted the form (unless there is a function whose name matches the button pressed).
Note that we generated the code to call the dbselect dollar function using the dollar function help screen shown here:
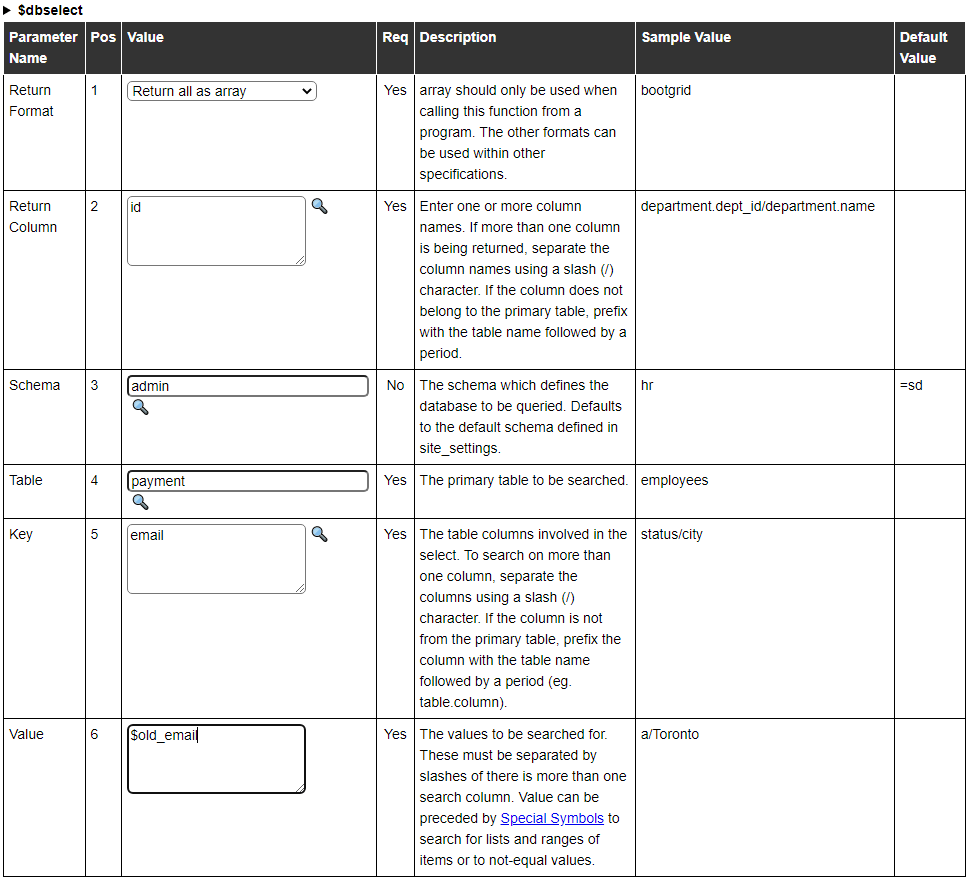
There are other database oriented dollar functions that you may want to use including dbcount which is used to obtain a count of records matching your search criteria. dblookup is used in place of dbselect if you are only expecting one record value to match your criteria.
Here we see the output of the program after we use it to update an email address:
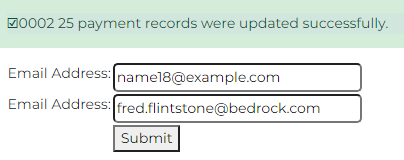
Notice that we used message numbers in our form handler. As you write your program, you can refer to messages as you need them and then, when you are finished, you can define the messages using the messages model. Here we see the four admin message we added to support this page:

Notice that we use substitution values in our messages. This makes it likely that we can re-use the same message for multiple scenarios.
Forms With Array Fields
Earlier we stated that we could not use the email field on our form because we needed two of them (one for the old email address and one for the new email). Technically, this was not actually true. The forms do allow you to repeat the same field multiple times on the form as we show here:

The only thing we would need to change in our form handler is that we would now need to reference these as array fields as shown here:
// The email field appears twice on the form so reference it as an array
$old_email = $this->field_list['email'][0]->value();
$new_email = $this->field_list['email'][1]->value();
Other db_object Methods
So far we have demonstrated these method's of a database object
retrieve_object is used to get a data object (collection of related tables and records)
update_object is used to change an object
insert_object is used to add an object
end_transaction is used to commit updates (including deletes and inserts)
backout_transaction is used to roll-back uncommitted database updates
Other methods include:
clear_object is used to reset the object's field values (in memory only)
delete_object is used to delete an object
retrieve_next_key is used to get the record with the next higher primary key or previous (next lower) primary key (by passing true)
All of these methods are used when you build a form to interact with the object. Let's finish off this help by building such a maintenance form for payments.
Object Maintenance Forms
We use the form model to build our maintenance form as you might expect. Begin by entering the name of your database object into the Field Definitions text field or use the magnifying glass to select it.

Next, click on the Build Default Form button to automatically create your form by inserting all of the fields from your database object.
You will see that a default form handler class has been added for you. In most cases you don't need to change this class.

Also, all of the fields from your object as well as a button form have been added.
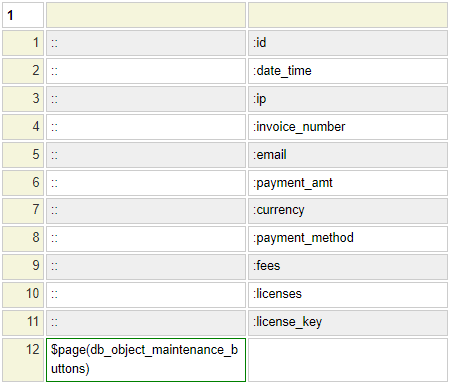
In most cases you will want to set other common form properties, in particular the Login Required option would normally be set so that only user with proper access can use this form.
After stowing the form we can use it to update payment records.
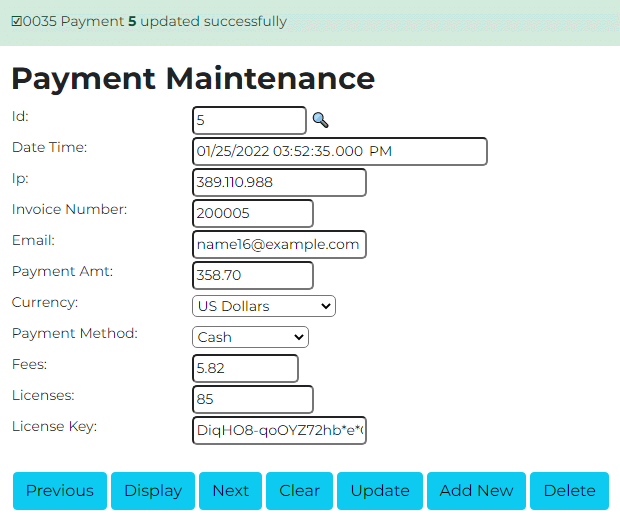
Next we will look at some of the components included in the GenHelm runtime in support of e-commerce websites.
Ecommerce Help Index
| E-Commerce Overview | Features and components used to build an online store. |
| Cart Items | Defining products and services. |
| Shopping Cart | Interacting with a shopping cart. |
| Working with Text Files | How to store and process transactional data using text files. |
| Working with Databases | Saving and retrieving database table data. |
| Transaction Numbers | Generating identifiers for invoices and other transactions. |
| Taxes and Fees | Configuring sales taxes and other cart fees. |
| Saving Customer Information | Reading and writing customer information. |
| Accounting Data | Managing account records. |
| Collecting Payments | Processing credits cards as order payments. |