A shopping cart is a fundamental object for most e-commerce applications. This is a class that simulates the behavior of a real world shopping cart in that users can perform common functions such as:
- Adding items to their cart
- Removing items from their cart
- Updating an item in their cart
- Proceeding to checkout cart items
The cart class uses information in the url to determine what actions are to be taken and which objects are to be added to the cart.
Rendering a Shopping Cart
The shopping cart can be rendered on any page by using the $cart() function. Here we see an example of a page that includes this function as part of the page content.

In order to add items to the cart, you must provide links to pages that allow the user to configure the items to be added. These pages are built using the form model and use form_handlers that interact with the cart class (defined in system).
Persistent Objects
The cart class, as well as the classes that represent cart items, make use of the class persistence featured offered by the GenHelm runtime. This allows you to retain information across different pages without having to explicitly use session variables. Objects are, in fact, stored in session variables however this is largely transparent to your programs. Persistent objects are particularly vital to applications like shopping carts because they often require several instances of the same classes to be cached between page requests. Trying to manage this using session variables to store individual properties would lead to chaos. To learn more about persistent objects, please refer to the help regarding the site object's create_object method.
In most cases, the cart object is instantiated by base classes that you inherit. If you need to interact directly with the cart you can do so by instantiating the cart and calling various methods. Here is an example that shows how to instantiate the cart and get various information from the cart. We also request the first item object from the cart and call methods of this item to obtain the dimensions of the item. In this example, the way we get the dimensions will depend on the class used to implement the item object.
// Load the cart from the session
$cart = $this->site->create_object('cart','',true);
// Make sure the cart has items
$item_count = $cart->get_item_count();
if (empty($item_count)) {
  $this->site->redirect('shop','It appears that your session has expired.'.
                        ' Unfortunately you will need to enter your order again.');
}
// Save information about the cart itself, as well as the first item in the cart
$data['items'] = $item_count;
$items = $cart->get_items();
foreach ($items as $item_key => $item_info) {
  if ($item_info['type'] === 'shipping') {
    continue;  // Shipping was created as a static item
  }
  // Get the first product
  $item = $cart->get_item_object($item_key);
  // Certain properties are available for all items
  $data['quantity'] = $item->get_quantity();
  $data['product'] = $item->get_product_code();
  // Other properties may be specific to a certain item
  switch ($item_info['class']) {
    case 'tarp_object':
      $data['material'] = $item->get_material();
      $dimensions = $item->get_dimensions();
      $data['width_major'] = $dimensions['tarp_width_major'];
      $data['width_units_major'] = $dimensions['tarp_width_units_major'];
      $data['width_minor'] = $dimensions['tarp_width_minor'];
      $data['width_units_minor'] = $dimensions['tarp_width_units_minor'];
      $data['length_major'] = isset($dimensions['tarp_length_major']) ? $dimensions['tarp_length_major'] : '';
      $data['length_units_major'] = isset($dimensions['tarp_length_units_major']) ? $dimensions['tarp_length_units_major'] : '';
      $data['length_minor'] = isset($dimensions['tarp_length_minor']) ? $dimensions['tarp_length_minor'] : '';
      $data['length_units_minor'] = isset($dimensions['tarp_length_units_minor']) ? $dimensions['tarp_length_units_minor'] : '';
      break;
    case 'product':
      $data['material'] = $item->get_description();
      $data['width_major'] = $item->get_width();
      $data['width_units_major'] = 'feet';
      $data['length_major'] = s$item->get->length();
      $data['length_units_major'] = 'feet';
  }
  break; // Only want the first item
}
$data['weight'] = $cart->get_total_weight();
$data['total_invoice'] = $cart->get_cart_total();
$data['subtotal'] = $cart->get_cart_subtotal();
$data['est_cost'] = $cart->get_total_cost();
// Pass this to a custom object to save the information
$saved = $invoice->save($data);
Defining Items
As we have learned in the help about defining cart item objects, most of the items that your customers add to their card are known as dynamic items since they are implemented using PHP classes that extend the system supplied class cart_item. The properties of the class include fields in which to store all of the characteristics of the item. Dynamic cart items must define a method, named build_item, which validates the item and set its price and description.
The cart object also supports something called a static item which does not utilize an item class. This is useful for "items", such as shipping costs, which are normally configured programmatically. To learn about static items, please follow this link which explains how shipping can be added to a cart.
In this help, we will continue to work with the paddle class whose properties are defined as follows:
class paddle extends \system\cart_item {
  protected const PADDLE_COLORS = array('black'=>'Black','red'=>'Red','navy'=>'Navy');
  protected const PADDLE_SPEED = array('slow'=>'Slow','medium'=>'Medium','fast'=>'Fast');
  protected $color;
  protected $speed;
  // ...
}
Creating a Product Form
We will be using the form model to create a form to enter the product information. First let's use the select model to define the paddle speed options.

We will stow this under the name paddle_speed.
It is generally a good idea to define all of your form fields in advance using the html_field model. This is especially important for fields that will be used on several different forms. We know that all of our order forms will need a quantity so let's define this one as an example. We edit the html_field model and stow the following definition under the name quantity.
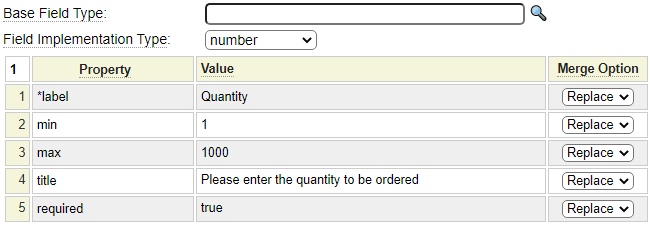
We can now use the form model to define the following form:
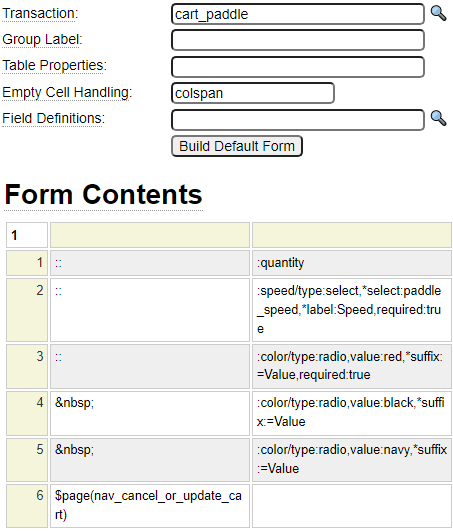
We stow this form under the name table-tennis-paddle. Let's go over the important aspects of this form.
- The shopping cart application uses the transaction model to manage the flow of forms between product pages and the main shopping cart application. We have not created the cart_paddle transaction yet so we will get a warning to that effect when we stow this page.
- Since the form rows don't have the same number of columns we set the Empty Cell Handling value to colspan so that colspan properties are generated automatically. We could, instead, click on the cells and use <ctrl>+Enter to open a window where we could manually enter the desired colspan settings and other table cell properties.
- We defined the quantity field in advance using the html_field model so no further definition of this field is required on the form.
- We define the speed field on-the-fly utilizing the select control we created earlier.
- To illustrate the use of radio buttons, we use these to define the color field. These all have the same name and the value property must be unique for each button. We use the *suffix property to show the value to the user. Rather than hard-coding the suffix, the =Value notation says "use the value but convert it to title case".
- To implement the buttons, we use a system supplied page called nav_cancel_or_update_cart. We review this below.
There is one more property that is not shown in the screen image above. Since this is the first form within the cart_paddle transaction we must set the Page Type to Transaction Start.

Using the nav_cancel_or_update_cart Form from system
Here we can see the definition of the nav_cancel_or_update_cart page that we are using from system:
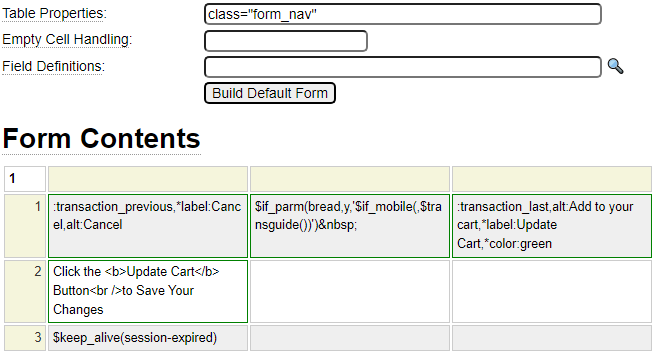
This is a fairly simple form so if you want to recreate this within your site rather than sharing this version from system you can simply logon to system and edit nav_cancel_or_update_cart then logon to your site and make any required changes and stow this directly within your site. Note the following about this form:
Forms that use transactions normally utilize three buttons; transaction_previous (to go to the previous screen), transaction_next (to go to the next screen) and transaction_last (to post the last screen). When defining our product there is only one form so we don't need a transaction_next button. These buttons are predefined and make use of the *color pseudo property. This causes the buttons to utilize the same framework used by the $link_buttons function.
There are several other built-in button forms that you can use. The one you choose will generally depend on how many pages are used to enter your cart item and which page is being rendered as explained in the screen shots below:
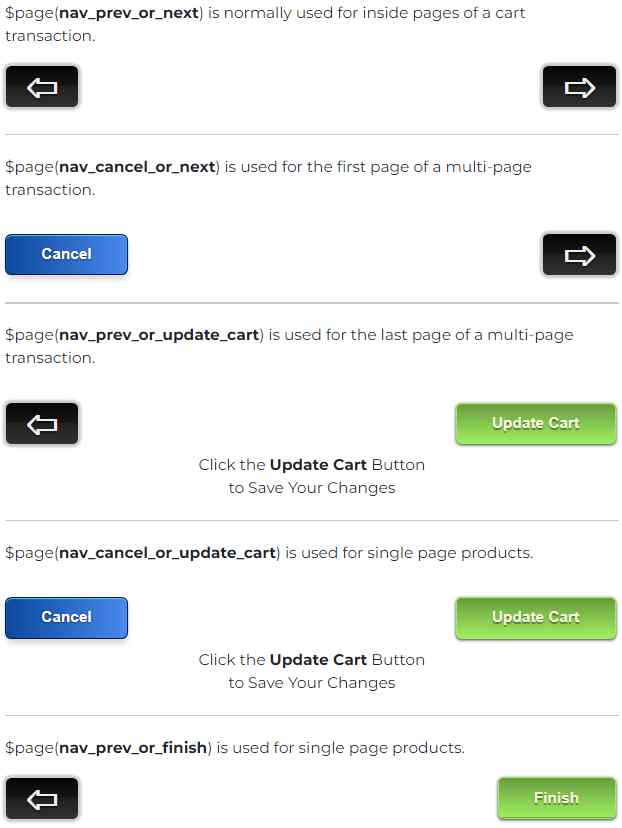
These pages all define with table property class="form_nav". Therefore, you should style this class to suit your site's requirements. For example:
.form_nav {width:100%; margin-top:1em;}Maintaining User Sessions
Notice that this form uses the $keep_alive function. This will cause the form to periodically issue an ajax request to ping the server so that the session does not time out causing the user to lose their order. If the session does time out the page will redirect to the system supplied page named session-expired. Since keeping sessions alive for an extended period of time will require more resources, this technique is normally limited to pages that contain a large number of fields that may take the user some time to complete. Nevertheless, the user of your shopping cart may be interrupted while making a purchase so it is a good idea to mitigate the risk that their session might time out.
Finishing Your Product Form
We won't show this here, however it is important that you make use of several form properties for SEO purposes. Here are some items that should be considered:
- Notice that we named our form, table-tennis-paddle, this will improve the rankings related to table tennis paddle searches.
- Be sure to give your page a meaningful title and heading.
- Your meta description should describe your product or service.
- If this is the only page that talks about your product, you will want to include text above or below the form fields to describe your product in detail. When possible, include an image of your product on the order page.
Defining the cart_paddle Transaction
Here we see the definition for the cart_paddle transaction:
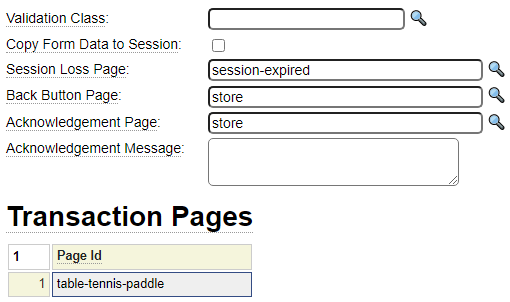
Notice that we don't want to check the option to Copy Form Data to the Session. The cart manages session data behind the scenes so we don't want our forms to make use of session variables to populate the form fields.
At this point you can test your form in isolation of the cart object as we have done here:
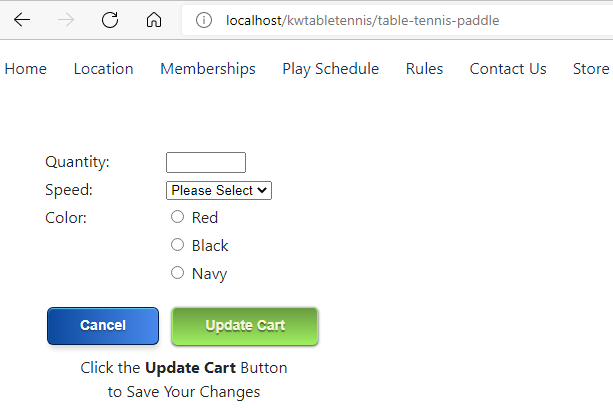
The buttons are already functional since these are controlled by the transaction object. We will need to develop a form_handler class to make this page fully functional.
Define a Simple Checkout Page
We need to jump ahead a little bit because, when we configure our cart, one of the things we will be defining is a link to your site's checkout page. For now create a simple form and stow it under the name checkout. If you prefer another page name you are free to use whatever name you want, however, the cart object assumes the checkout page is named checkout so you will need to override this if you use a different name. For now you can just create a simple form such as the following as a temporary checkout page:

Creating a form_handler for your Product Form
Recall that forms, all by themselves, don't do very much. You usually need to add a form_handler to your forms to make them perform some function. In the case of your product (item) forms, the main purpose of the form_handler is to act as a go-between or conduit between your form values and your product object. The base classes of your form_hander also interface with the cart object.
Load and Change Cart form_handler Example Code
We begin by invoking the form_handler model using the "e form_handler" command. Since cart form_handlers follow a certain pattern example code is available to help you get started. To load the sample code enter the command "example cart". This will load several functions with type "example". Cart form_handlers normally extend the system base class named cart_form_handler_base. This handles much of the logic for you. The only method that is required by our simple paddle form handler is define_item_implementation. Here we show the code for this method:
function define_item_implementation() {
	$this->item_class = 'paddle'; // Extends cart_item
	$this->item_type = 'table_tennis_racket'; // Used to differentiate cart items
}
The cart object needs to know your product item implementation class since the cart is responsible for creating and synchronizing the cart item objects with the session. You can implement several different products using the same class. In such a case, item_type tells the item class which type of product it is dealing with. If you have lots of product item classes, you could group these within a subfolder of classes. If you do so, you will also need to assign $this->item_subfolder to indicate where your product item class can be found.
We can leave the example functions in the form_handler specification in case we want to refer to them later. After changing the define_item_implementation function we stow our form_handler under the name paddle_form_handler.
Link the Form Handler to the Form
Next update the table-tennis-paddle form and add a reference to our form_handler as shown.

Create a Store Page
Your site will need to provide links to allow users to add items to the cart. Normally these links will be accessible directly from the page that contains your shopping cart so that your visitors can easily find the links. Here we show our store page created using the tags model. This includes the $cart function as well as links to our product pages defined using the $link_buttons function.

This is what the store page looks like in the browser before we have added any items to the cart:
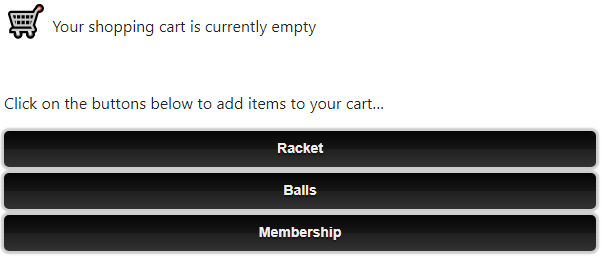
When visitors click on the racket link they will be taken to our table-tennis-paddle page. Here we show what happens if we try to order a fast rubber in red:
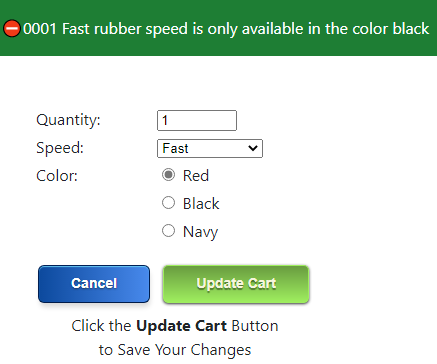
In the above example, we show the error message at the top of the form. You can also configure the site to show errors in a popup like this:
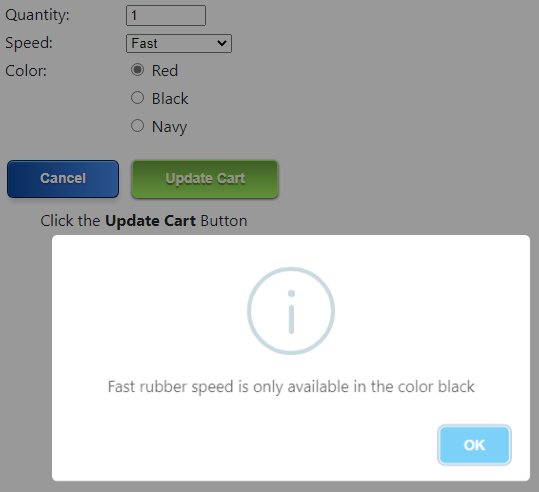
To learn more about this feature please visit the messages model help.
Once we enter a valid configuration, we are taken back to the shop page (via our transaction object) and we can see that we now have an item in our cart.

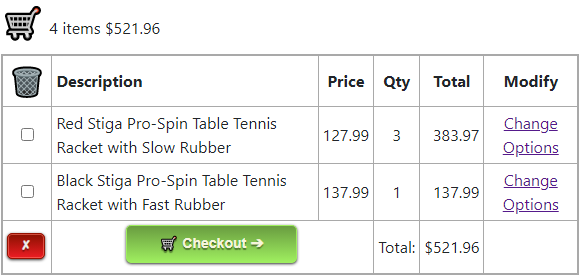
The Change Options link takes the user back to the product page in order to change the quantity or other information. The screen above was tested before we enhanced the description assignment in the paddle object. You can see that it does not provide much detail about the options specified so users could mistakenly order a red paddle when they really wanted a navy paddle.
Testing Our Cart Items
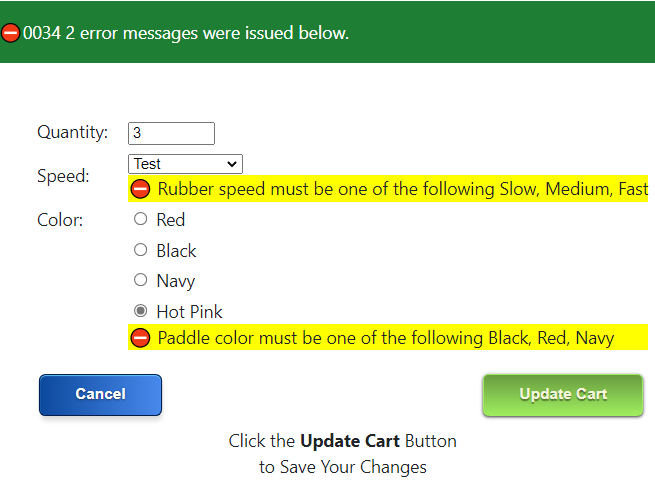
Recall that our paddle cart item contains validation within the set methods to make sure that only valid colors and speeds can be assigned to the object. It is a good idea to test this validation even though our form also restricts the user to only valid values. To this end, let's temporarily add an invalid value to our select and an invalid color to the form to try to trigger this validation.
Notice that these errors appear below the fields since the form handler is able to correlate the errors with the field that triggered the error.
Below we show the improved cart after we enhanced the product description to include information about the speed and color of the racket.
Making the Select Field Self Updating
Recall that we used a select field to allow the user to select a color for their paddle. The way we have implemented this, if new colors are introduced we would need to update two separate components:
- The select field
- The paddle object
Since the paddle object exposed the valid color constants with a static get method, why not make use of these values when building the select control? Below we can see that the select field has been changed to build the drop-down options dynamically rather than hard-coding these values.
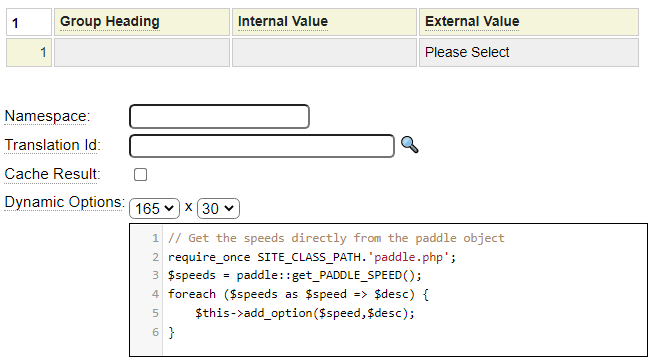
After making this change, the select field will automatically adapt to any color changes made by the paddle object. Notice that, since the get methods for constants are implemented as static methods, we don't need to instantiate the paddle object in order to call the get_PADDLE_SPEED method.
Advanced Cart Concepts
So far we have covered the basic cart features needed to add simple products to your cart. Next we will describe some more advanced features and we link to other pages that you can reference to learn about these options.
Configuring the Cart
By default, the cart object defaults to US Dollar transactions. If you want to change the default currency or support multiple currencies you can configure the tarp to support this. Furthermore, if you want to change the appearance or language of the cart please follow this link related to configuring the cart object.
Field Mapping
In the paddle example, we did not require any code to map the form fields (quantity, speed and color) to the paddle object. The reason that this was handled automatically is that the names of the fields on our order form exactly coincided with the names of get and set methods in our paddle object. Sometimes this won't be the case. If the fields don't perfectly align in your situation you should follow this link to learn how to deal with mismatched field names.
Developing Generic Forms and Page Handlers
One of the drawbacks of the approach we have used in our paddle example is that it may be difficult to scale this to 100s of products. If you are building a store that have a lot of products you should follow this link to learn how to develop generic Forms, Item Objects and Page Handlers.
Ecommerce Help Index
| E-Commerce Overview | Features and components used to build an online store. |
| Cart Items | Defining products and services. |
| Shopping Cart | Interacting with a shopping cart. |
| Working with Text Files | How to store and process transactional data using text files. |
| Working with Databases | Saving and retrieving database table data. |
| Transaction Numbers | Generating identifiers for invoices and other transactions. |
| Taxes and Fees | Configuring sales taxes and other cart fees. |
| Saving Customer Information | Reading and writing customer information. |
| Accounting Data | Managing account records. |
| Collecting Payments | Processing credits cards as order payments. |