If you are likely to have repeat business you should consider saving your customers' information so that they do not have to re-enter this if they return to your online store to reorder products or services. This help explains techniques for capturing and storing customer information that you can use when building your store.
Security Implications
Before deciding on your approach you should consider the security implications related to what you are planning to store. Generally speaking, avoid storing sensitive data if at all possible. For example, if you give your users the option to store their credit card details, in case they want to make future purchases, you are essentially alerting hackers that you have valuable information stored within your site or hosting platform. This makes your site a potential target and raises the level of hardening that should be conducted. In this example, the minor inconvenience to your customers of having to re-enter their credit card data each time they make a purchase generally does not warrant the increased risk assumed by storing your customer's credit card details for future use. Furthermore, credit cards expire which introduces additional obstacles when credit cards are stored.
If you do plan to store sensitive data on your servers, at the very least, this information should be encrypted so that rogue employees or hackers are not able to do anything with the information if they are able to breach or compromise your system.
In this help we will be discussing how to save basic customer information such as names, addresses and phone numbers. This will be keyed on the user's email address so that when repeat customers enter their email address we can automatically fill in their other information. Technically, this technique could be perceived as a vulnerability since if one user happens to enter an email address of another user they could see this user's address and phone number. Nevertheless, this is not an egregious violation for the following reasons:
- For most types of businesses, with say a few thousand customers, it would be extremely unlikely that a user or a hacker could "guess" the email address of an existing customer. This is particularly true if we build in measures to thwart bots from attempting to harvest information.
- Even if this were to occur, names, addresses and phone numbers are virtually public domain with very little value so the risk associated with the discovery of this information is very low.
Be that as it may, if you are concerned about this risk, there are ways to circumvent or mitigate this such as:
- Requiring multiple pieces of information in order to automatically look up your customer's information. For example, in addition to their email address you could require your customers to provide answers to security questions or perhaps supply the last 4 digits of their phone number.
- Requiring customers to log in with a user id and password in order to access their information.
- Avoiding saving the information on your server. For example, if you don't need this information for further processing you could store it within browser cookies instead of on the server. This way, at least users would not have to re-enter the information when the use the same device they used to enter an earlier order.
Entering and Saving Customer Data
We have seen how easy it is to build forms in GenHelm. Here we show a typical checkout sequence wherein we:
- Ask the user for their email address
- Check to see whether we already have their email address in our system
- Preload their contact information if it is available
- Allow the user to change their information
- Save or resave the information to the system
In the following sections we will show you:
- The forms used to collect the customer data at checkout.
- The GenHelm definition of each form.
- The form_handler methods used to process the forms.
Email Address Entry
In this first form, we ask the user for their email address. We will save this in a cookie so that the next time they return to our site, their email address will default to what they used last time.
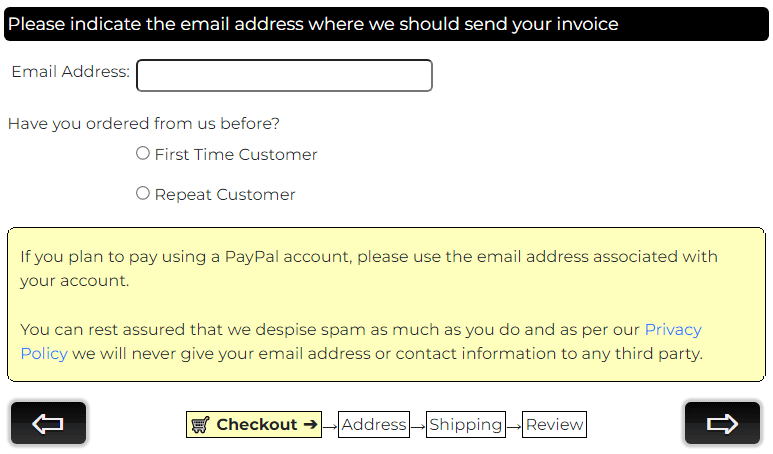
Here we see the form definition used to render the above form:
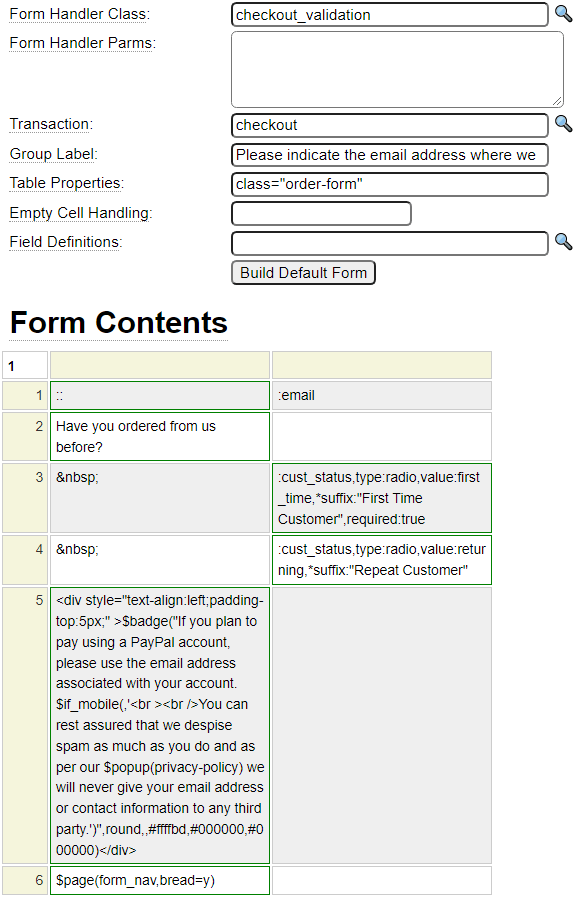
Since this form links to a transaction object it must be defined as Page Type "Transaction Start".
Notice that the form references the checkout_validation form handler. We will review this in the next section. The form uses the $badge function to render the yellow area. Nested within this is a reference to $popup which is used to popup a privacy-policy page in a window.
In the last cell we load the default navigation buttons from system passing a parameter to request that breadcrumbs be shown. Here we see the definition for this form:

Notice that the buttons transaction_previous and transaction_next are included on this page. These, along with transaction_last are standard buttons that are handled by forms linked to transactions. Since these buttons can be used by different sites, the page tries to accommodate styling choices made at the site level. It does so by using the $get_config function, which is capable of looking up the configurations that are set at the site or layout. This enables the button color scheme to be controlled within site settings as shown here:

There are several other dollar functions in play on this form_nav page which we describe next.
Breadcrumbs
Notice, on the rendered checkout form above, there is a navigation aid shown between the two buttons. This can be added to forms whose navigation is controlled by a transaction object by utilizing the $transguide function. This guide uses the Short Link Text from the pages involved in the transaction. Here is the Short Link setting for the checkout page:

Notice the $transguide function is included conditionally using two other dollar functions. $if_parm and $if_mobile.
$if_parm
This function generates certain code based on the value of a parameter value. The parameter can be passed to the page by the container page as in $page(form_nav,bread=y). In this way, the page that embeds the nav buttons can control whether the breadcrumbs are to be shown. The $if_parm function can also be used to create conditional logic based on values passed via the query string.
$if_mobile
Phones and other small devices generally don't have sufficient space to show the breadcrumbs between the buttons, so this dollar function is used to skip the generation of $transguide if the user is on a mobile device.
form_handler checkout_validation Functions
As we will see, the checkout_validation form handler is linked to all of the forms used during the checkout process. Therefore, rather than defining methods named get and post, which are called for all pages, we will code the page-specific equivalent methods. Since the page above is called checkout, the method get_checkout will only be called during get processing for this page. Similarly, post_checkout is only called when the checkout page is posted. Let's review the form_handler functions that are used by this first page of the checkout process:
function get_checkout() {
  	// If there are no items in our cart, our session must have timed out
   	$cart = $this->site->create_object('cart','',true);
   	$items = $cart->get_item_count();
	if (empty($items)) {
		$this->site->redirect('shop','It appears that your session has expired.'.
                              ' Unfortunately you will need to enter your order again.');
	}
  	// If we can load the users email from a cookie they must be a return visitor
	// so default the radio button
	if ($this->default_email_from_cookie()) {
		$this->field_list['cust_status'][0]->assign('returning');
	}
}
function default_email_from_cookie() {
	$email = $this->field_list['email']->value();
	if (empty($email)) {
      	// Try to load the email from a cookie
		$email = $this->site->dollar_function('cookie','email_address');
	}
	if (!empty($email)){
		$email = strtolower($email);
		$this->field_list['email']->assign($email);
	}
	return $email;
}
function post_checkout() {
	if ($this->button_pressed === 'transaction_previous') {
		return true; // Back button returns to cart
	}
	$cust_status = $this->field_list['cust_status']['0']->value();
	if ($cust_status === 'returning') {
		if (isset($_SESSION['email_attempts']) and sizeof($_SESSION['email_attempts']) > 6) {
			$this->site->redirect('shop','You have attempted to enter too many email addresses, '.
								  'please contact us to ascertain the correct email');
		}
		$email = trim(strtolower($this->field_list['email']->value()));
		$_SESSION['email_attempts'][$email] = true;
		$found = $this->load_session($email);
		if ($found === true) {
			return true;
		}
		if ($found === false) {
			$msg = 'We could not locate an account for email address '.htmlentities($email).
				'<br />If you are sure you ordered from us before, please use the same address'.
				' that you used previously or check the First Time Customer option';
		}
		else {
			$msg = $found;
		}
		$this->field_list['email']->assign_message_text('danger',$msg,__LINE__.' '.__CLASS__);
		return false;
	}
	return true;
}
Function load_session($email_address) {
	$file_name = $email_address;
	// Divide session files into folders according to the first letter of the email address
	// so that folders don't get so big
	$folder = substr($file_name,0,1);
	$result = $this->site->dollar_function('session_restore','sessions/'.$folder.'/'.$file_name);
	if ($result === false) {
		return false;  // Not found
	}
	if (substr($result,0,6) === 'Error:'){ // Not well formed XML for example
		return $result;
	}
  	return true;
}
Further to our earlier comments about preventing bots from trying to get email details from our system we define some code to limit the number of different email addresses that the user can attempt to lookup.
The $session_restore function is used to populate session data from information stored as XML (by $session_save which we will see later). One of the features we selected on the checkout transaction is this option:

Since this option is used, when we assign session variables whose name matches a form field, these form fields will be automatically synchronized with the session variables. Therefore, when we present the user with the form to enter their contact information, the values will be pre-populated if we copied the saved XML to the session.
Rather than store all of these XML files in one folder, we split the session data into separate folders named according to the first character of the user's email address. This will allow us to store up to say 50,000 email addresses before the folders start to get hard to manage. If you anticipate having more customers than this you should consider a database-oriented solution instead.
Customer Information Entry
Here we see an example of what the user might see after pressing the right arrow (transaction_next button) assuming that they successfully looked up their contact information from an earlier purchase.
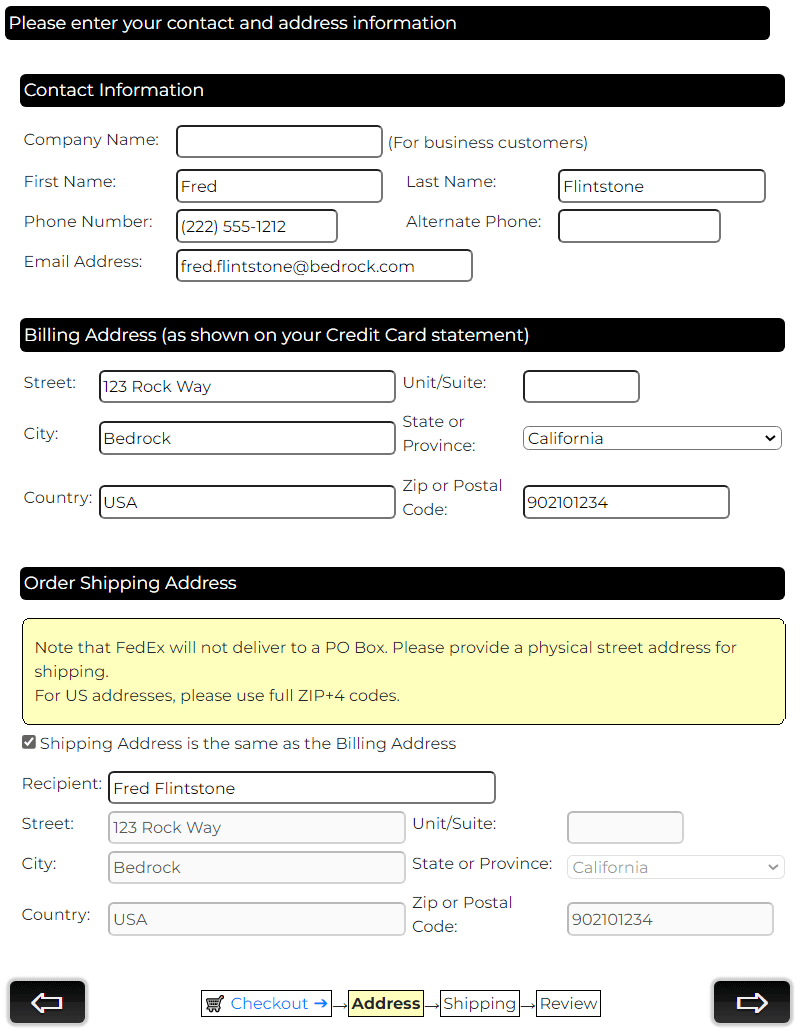
Since this form consists of several groups of fields it is best to implement each group as a separate component built using the form model. You then group the individual components onto a master form as shown here:
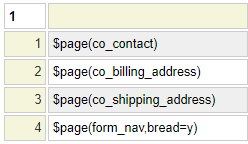
Since this form is part of the checkout transaction it must be defined as Page Type "Transaction Next".
Let's review the form_handler methods that are specific to this form next.
function post_co_addresses() {
  if ($this->button_pressed === 'transaction_previous') {
    return true; // Don't validate when returning to a previous form
  }
  // Save the address details to a session xml object
  $billing_state = $this->field_list['billing_state_or_province']->value();
  if ($billing_state === 'Outside USA/Canada') {
    $country = $this->field_list['billing_country']->value();
    $valid = $this->check_foreign_country($country,'Billing');
    if ($valid !== true) {
      $this->field_list['billing_country']->assign_message_text('danger',$valid,__LINE__.' '.__CLASS__);
      return false;
    }
  }
  else {
    $country = $this->get_country($billing_state);
    if (!$country) {
      $this->field_list['billing_state_or_province']->assign_message_text('danger',
                'We could not locate the supplied billing state or province: '.$billing_state,
                 __LINE__.' '.__CLASS__);
      return false;
    }
    $this->field_list['billing_country']->assign($country);
    $_SESSION['billing_country'] = $country;
  }
  $copy = $this->field_list['shipping_same_as_billing']->value();
  if ($copy) {
    foreach(array('address','suite','city','state_or_province','zip_code','country',) as $addr) {
      // Copy billing session field form fields to the shipping fields
      $_SESSION['shipping_'.$addr] = $_SESSION['billing_'.$addr];
      $this->field_list['shipping_'.$addr]->assign($this->field_list['billing_'.$addr]->value());
    }
  }
  else {
    $shipping_state = $this->field_list['shipping_state_or_province']->value();
    if ($shipping_state === 'Outside USA/Canada') {
      $country = $this->field_list['shipping_country']->value();
      $valid = $this->check_foreign_country($country,'Shipping');
      if ($valid !== true) {
        $this->field_list['shipping_country']->assign_message_text('danger',$valid,__LINE__.' '.__CLASS__);
        return false;
      }
    }
    else {
      $country = $this->get_country($shipping_state);
      if (!$country) {
        $this->field_list['shipping_state_or_province']->assign_message_text('danger',
                      'We could not locate the supplied shipping state or province: '.$shipping_state,
                      __LINE__.' '.__CLASS__);
        return false;
      }
      $this->field_list['shipping_country']->assign($country);
      $_SESSION['shipping_country'] = $country;
    }
  }
  $email = htmlentities(strtolower(trim($this->field_list['email']->value())));
  $folder = substr($email,0,1);
  $this->site->dollar_function('session_save','sessions/'.$folder.'/'.$email,'include',
                  'first_name/last_name/companyname/shipping_name/billing_address/billing_suite/billing_city/'.
                  'billing_state_or_province/billing_zip_code/billing_country/shipping_same_as_billing/'.
                  'shipping_address/shipping_suite/shipping_city/shipping_state_or_province'.
                  '/shipping_zip_code/shipping_country/phone/alternate_phone');
  return true;
}
function check_foreign_country($country,$which) {
  if (empty($country)) {
    return 'You have selected Outside USA/Canada as your '.$which.
      ' Province/State, please enter your region and country in the '.
      $which.' field. You will be charged in US dollars';
  }
  $lcountry = strtolower($country);
  $check = array('canada'=>'Canada','usa'=>'USA','us'=>'USA','united states'=>'USA');
  if (isset($check[$lcountry])) {
    return 'Your '.$which.' Country cannot be '.$country.
      ' since your have chosen Outside USA/Canada as the Province/State.'.
      ' Please choose a valid state/province';
  }
  return true;
}
function get_country($state) {
  // Call a static system method to determine what country a certain state/prov is in
  $valid = \system\us_canada_states_provinces::get_country($state);
  if (isset($valid['country'])) {
    return $valid['country'];
  }
  return false;
}
As you can see, much of this code involves defaulting the country if the user has selected one of the 50 US states or 10 Canadian provinces. One of the "states" that the user can select is named "Outside USA/Canada". If the user chooses this option, they must enter a country value other than USA or Canada. The customer's contact information is saved to an XML file using the $session_save function. Here we show an example of such an XML file:
<?xml version='1.0' encoding='UTF-8'?>
<ROOT>
	<session_data version="1">
		<companyname />
		<first_name>Fred</first_name>
		<last_name>Flintstone</last_name>
		<phone>(222) 555-1212</phone>
		<alternate_phone />
		<billing_address>123 Rock Way</billing_address>
		<billing_suite />
		<billing_city>Bedrock</billing_city>
		<billing_state_or_province>California</billing_state_or_province>
		<billing_country>USA</billing_country>
		<billing_zip_code>90210-1234</billing_zip_code>
		<shipping_same_as_billing>1</shipping_same_as_billing>
		<shipping_name>Fred Flintstone</shipping_name>
		<shipping_address>123 Rock Way</shipping_address>
		<shipping_suite />
		<shipping_city>Bedrock</shipping_city>
		<shipping_state_or_province>California</shipping_state_or_province>
		<shipping_country>USA</shipping_country>
		<shipping_zip_code>90210-1234</shipping_zip_code>
	</session_data>
</ROOT>
Collect Shipping and Other Miscellaneous Information
This next screen is used to collect shipping preferences as well as other relevant information.
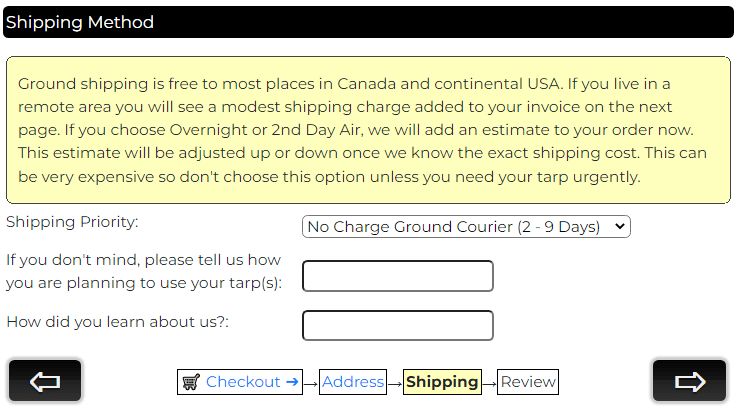
Let's suppose that we have added custom behavior for the 'shipping' item type as described in the cart config help. Further suppose that shipping is free within the US excluding Alaska, which costs $125. The user can also choose overnight shipping at an additional cost of $150 or second day shipping for an additional cost of $100. Here we show how the form_handler can add a static item to the cart to reflect this shipping charge. This is referred to as a static item since it does not have an item class associated with it.
Adding a Static Shipping Item
function post_co_shipping() {
	require_once(SITE_CLASS_PATH.'get_fedex_fees.php');
	// Check shipping cost to ship location
	$ship_fees = new get_fedex_fees();
	$ship_to_zip = $_SESSION['shipping_zip_code'];
	$shipping_cost = $ship_fees->get_shipping_cost($ship_to_zip);
	$when = $this->field_list['shippingoption']->value();
	switch($when) {
		case '2nd Day Air':
			$shipping_cost += 100;
			break;
		case 'Overnight Express':
			$shipping_cost += 150;
			break;
	}
	if ($shipping_cost == 0) {
		$description = 'Free '.$when.' shipping included';
	}
	else {
		$description = $when.' Shipping to '.$_SESSION['shipping_state_or_province'].
			' '.$_SESSION['shipping_zip_code'];
	}
   	//
   	// Open the shopping cart and add a static item
	$persist['save'] = true;
	$persist['required'] = true; // Fail if cart not in session
	$cart = $this->site->create_object('cart','',$persist);
	$cart->create_static_item('shipping',$description,1,$shipping_cost);
}
The parameters to the create_static_item method are shown below. The $other parameter is an optional array of other properties.
function create_static_item($type,$desc,$quantity,$price,$weight=0,$cost=0,$other=null)
Here we see what the cart might looks like after changing the shipping address to Alaska.
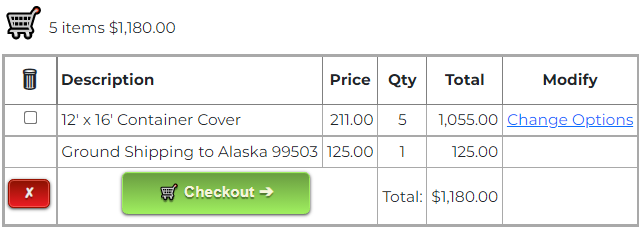
Note the following:
- The user is not allowed to remove the shipping charge from the cart.
- The shipping "item" is not counted in the total items shown at the top of the cart due to the way the shipping item behavior was configured.
Summarize the Order
The final step of the checkout process should generally present a summary of what the user has ordered to give them a final opportunity to review their order before committing. Notice in this view of the cart we now see any additional fees that may be applicable. In this example we assume that the owner of the online store is based in California and, as such, they are obliged to charge California state taxes when shipping items within California. To learn how to add taxes and other fees to a cart please visit this page.
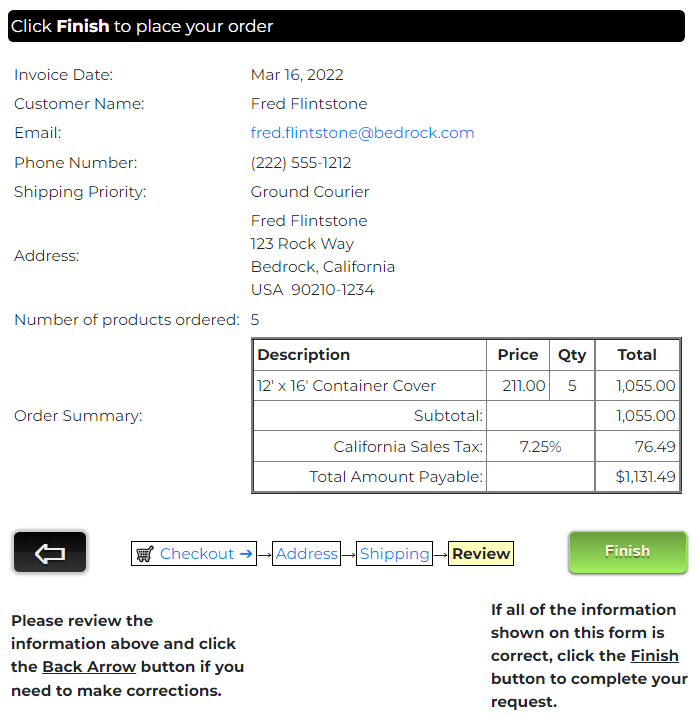
Here we can see that this page is just a simple form.

Notice that most of the page is built using a reference to a page named order_summary. This is very deliberate since we want to use versions of this order summary in a variety of ways. For example,
- We will send an order summary to our customer as an email.
- We will save a copy of the order in our system in case we need to refer back to it.
- We obviously show the user the order summary via the web page summary above.
By defining the order summary as a web page using the custom model, it gives us a great deal of flexibility to repurpose this code in a wide variety of ways. We can even pass parameters to this page via the query string to "tweak" the summary as needed. For example, when we send this as an email to the customer we might want to add a link to allow the user to pay for the order in case they have not done so. We will look at the order_summary page a little later, let's first refer to the checkout transaction created using the transaction model.
Transaction Model
We can see here that the four pages that we have reviewed above are listed as the Transaction Pages below. This is used by the transaction_previous and transaction_next buttons to determine which page to load next. If the user clicks the transaction_previous button while on the first page this returns to the shop page since this is indicated as the "Back Button Page". If the user clicks the transaction_next (or transaction_last) button while on the last page, this redirects the user to the initiate-payment page indicated as the "Acknowledgement Page".
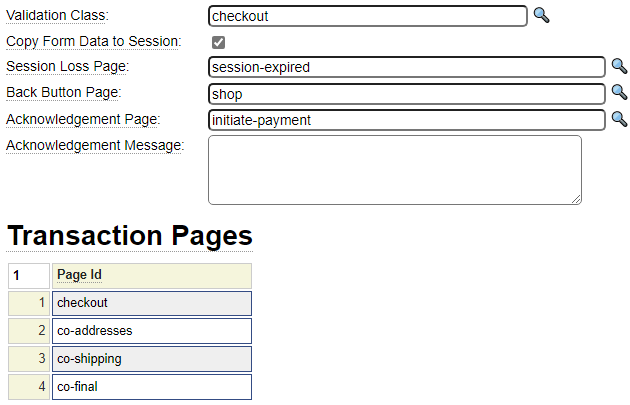
Now take a look at some of the other settings defined on the checkout transaction:
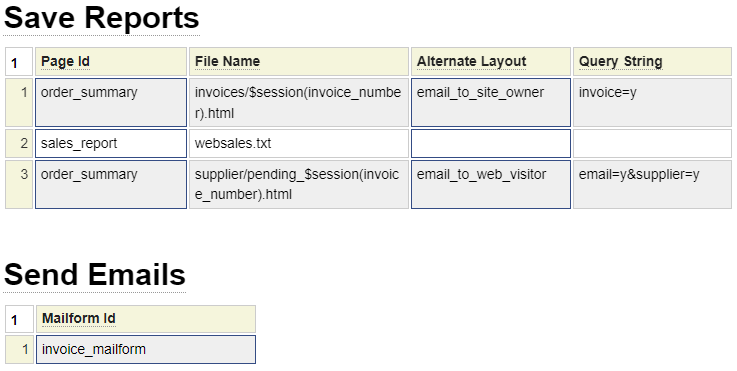
When the user successfully posts the last page of the transaction (in this case the co-final page), the form automatically saves any files associated with the transaction and processes any mailforms indicated.
In this case we will be saving three separate files. The first and last file are generated using the custom page order_summary. The order_summary page will be passed the parameter invoice=y when building the first page and it will be passed the parameter email=y&supplier=y when building the second page. This allows the order_summary custom page to adapt its output according to how the content will be used. For the first and last file, the specified file name includes the invoice number taken from a session variable by using $session. Since these file names will not already exist, they will be created. In the case of the second file, this has a static file name so this file will only be created once (for our very first order). After that, since the file will already exist it will be appended to for each order. The page we are appending was created using the report model which generates a tab-delimited list of fields. This report definition is too wide to show in its entirely however we show part of it below:

Note that, although we passed the parameter email=y to the order_summary page for report 3, this is not actually sent as an email at this point. We don't send this order to our supplier yet for two reasons:
- At this point, the customer has not yet paid for the order, and may not do so.
- We don't know if this is a product that we have in stock and will ship directly or whether we will route the order to a supplier to be drop-shipped.
Nevertheless, we want to save the order in a suitable format in case we do need to send this to a supplier later.
You can see that the transaction definition also includes references to mailform definitions. This is so that we can send an order summary to the customer even though they have not yet paid for it. Here we show the definition for the referenced mailform:
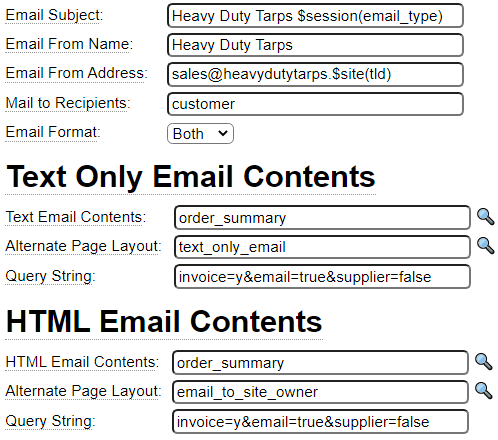
Notice that we can make various aspects of the email dynamic by leveraging dollar functions. Once again we use the order_summary page to build the content for the email according to the parameters passed on the query string. Since the transaction selected the option to "Copy Form Data to Session", the order_summary page has access to session variables including the cart object.
The order_summary Page
Recall that pages created using the custom model are required to define a generate section which returns the contents of the page to be rendered (not including any layout content). Here we show a snippet of the generate section.

As shown above, the page first checks to see whether the user has just clicked the transaction_previous button. In this case, we don't need to bother rendering the order because we will be redirecting to the previous page in any case.
Next we collect the values that were passed to the page via the query string. These determine who the "audience" for the page will be so that we can dynamically adapt the page output according to its intended purpose.
if (isset($_POST['button_pressed']) and $_POST['button_pressed'] === 'transaction_previous') {
	return true;
}
$email = $this->site->parameters->get_or_default('email',false,'boolean');
$invoice = $this->site->parameters->get_or_default('invoice',false,'boolean');
$supplier_copy = $this->site->parameters->get_or_default('supplier',false,'boolean');
We define this simple function to wrap the addresses with suitable labels and HTML format.
Function build_address($street,$unit,$city,$state,$country,$zip){
$address = htmlentities($street,ENT_COMPAT,'UTF-8').'<br />';
if (!empty($unit)){
$address .= 'unit '.htmlentities($unit).'<br />';
}
if ($state == 'Outside USA/Canada'){
$use_state = '';
}
else {
$use_state = ', '.$state;
}
$address .= htmlentities($city.$use_state,ENT_COMPAT,'UTF-8').'<br />';
$address .= $country.' '.htmlentities($zip);
return $address;
}
As we have done above you should always sanitize data entered by the user by passing this through PHP's htmlentities function before rendering it on a page.
Here we show the bulk of the remaining code. This is mainly just formatting the customer and order details into a table that is used to render the order_summary.
$customer[] = array('Invoice Number:',$_SESSION['invoice_number']);
$customer[] =  array('Invoice Date:',$this->site->dollar_function('date','','','mon day, year'));
if (!empty($_SESSION['companyname'])){
	$customer[] = array('Business Name:',htmlentities($_SESSION['companyname'],ENT_COMPAT,'UTF-8'));
}
$customer[] = array('Customer Name:',htmlentities($_SESSION['first_name'].' '.
                                                  $_SESSION['last_name'],ENT_COMPAT,'UTF-8'));
$customer[] = $next_row;
if (!$supplier_copy) {
	$customer[] = array('Email:','<a href="mailto:'.$email_address.'">'.$email_address.'</a>');
}
$customer[] = array('Phone Number:',$_SESSION['phone']);
$billing_address = $this->build_address($_SESSION['billing_address'],$_SESSION['billing_suite'],
                  $_SESSION['billing_city'],$_SESSION['billing_state_or_province'],
                  $_SESSION['billing_country'],$_SESSION['billing_zip_code']);
if ($_SESSION['shipping_same_as_billing'] == 'checked'){
  $shipping_address = $billing_address;
}
else {
  $shipping_address = $this->build_address($_SESSION['shipping_address'],$_SESSION['shipping_suite'],
                    $_SESSION['shipping_city'],$_SESSION['shipping_state_or_province'],
                    $_SESSION['shipping_country'],$_SESSION['shipping_zip_code']);
}
$shipping_name = empty($_SESSION['shipping_name']) ? '' : htmlentities($_SESSION['shipping_name']).'<br />';
if ($supplier_copy) { // Only include shipping address
	$customer[] = array('Shipping Address:',$shipping_name.$shipping_address);
}
elseif ($_SESSION['shipping_same_as_billing'] == 'checked'){
	$customer[] = array('Address:',$shipping_name.$address);
}
else {
	$customer[] = array('Billing Address:',$billing_address);
	$customer[] = array('Shipping Address:',$shipping_address);
}
//
// Load the shopping cart
$persist['save'] = true;
$persist['required'] = true;
$cart = $this->site->create_object('cart','',$persist);
$products_ordered = $cart->get_item_count();
$customer[] = array('Number of products ordered:',$products_ordered);
if ($supplier_copy) {
	$customer[] = array('Order Summary:',$cart->priceless_cart_summary());
}
else {
  	// Pass the shipping state/province to the cart so the correct taxes are generated.
	$cart_table = $cart->cart_summary($_SESSION['shipping_country'],$_SESSION['shipping_state_or_province']);
	$customer[] = array('Order Summary:',$cart_table);
   	$_SESSION['invoice_total'] = $cart->get_cart_total();
   	$_SESSION['invoice_total_formatted'] = $cart->get_cart_total(true);
   	$_SESSION['invoice_subtotal'] = $cart->get_cart_subtotal();
	$tarp_text = ($email or $invoice) ? $this->build_custom_tarp_details() : '';
	if ($email) {
		$tarp_text .= '<br />If you have not yet paid for your order, please visit the '.
		$this->site->dollar_function('link','bill-payment').' form on our website.';
	}
}
$html_table = new \system\array_to_table(); // Generate an HTML table from a PHP array
$html_table->set_table_properties('class="order_table"');
return $html_table->generate($customer).$tarp_text;
Let's review some of the important aspects of the code above.
- Since our transaction is configured to synchronize form fields with the session we can reference session variables whose names coincide with our form fields. However, this does not apply to cart values. To obtain cart information we first must instantiate the cart from the session by calling the site's create_object method.
- The supplier copy of the order is used to send a purchase order to our supplier, when creating this copy of the order we don't want to show any prices so, for this, we call the cart's priceless_cart_summary method.
- To get an HTML formatted view of the order that we show to the customer we call the cart's order_summary method. This method needs to be passed the location of the customer since this is needed to determine the taxes to be applied.
- To obtain the total order amount, call the cart's get_cart_total method. Pass a parameter of true if you want this to be formatted as a currency.
- The cart's get_cart_subtotal method returns the cart total before any taxes and fees are applied. If shipping is added as an order item (rather than a fee), this will be included in this subtotal.
Notice that one of the internal functions called above is named build_custom_tarp_details. This function, shown below, needs to load all of the items from the cart whose type is custom_tarp. For these items it calls the load_item_object method, passing in the item to be loaded. This returns an instance of the item_object. In this example, the code calls a method of the item to obtain a detailed description of the product as configured by the user.
function build_custom_tarp_details($cart){
   //
   // If any custom tarps were ordered, provide details for these
    $tarp_text = '';
    $products = $cart->get_items('type','custom_tarp');
    if ($products != false) {
    	$tarp_text = '<br /><h1>Custom Tarp Details</h1>';
    	$total_tarps = sizeof($products);
    	foreach ($products as $index => $value) {
          $tarp = $cart->load_item_object($index);
          // Ask the tarp to describe itself
          $tarp_text .= $tarp->get_detailed_description(++$current,$total_tarps);
    	}
    }
    return $tarp_text;
 }
If you want to load all items within the cart (not including fees and taxes) you can omit the parameters to the get_items method as shown here:
$item_info = '';
$products = $cart->get_items();  // Get all items
foreach ($products as $key => $item) {
	$tarp_text .= 'type: '.$item['type'].' Quantity: '.$item['quantity'].' Weight: '.$item['weight'].
      	' Price: '.$item['price'].' Cost:'.$item['cost'].'<br />';
}
At this point in the process, the user has placed an order but it is not yet paid for. It is generally a good idea to separate the order entry process from the payment process in order to give your customers the opportunity to pay for the order later. Nevertheless, you will need to make sure that you tie the fulfillment process to the payment receipt unless you place to extend credit to your customer(s). Since we are allowing payment to occur later, we need a way to keep track of what the customer owes. Let's review the account management features next.
Ecommerce Help Index
| E-Commerce Overview | Features and components used to build an online store. |
| Cart Items | Defining products and services. |
| Shopping Cart | Interacting with a shopping cart. |
| Working with Text Files | How to store and process transactional data using text files. |
| Working with Databases | Saving and retrieving database table data. |
| Transaction Numbers | Generating identifiers for invoices and other transactions. |
| Taxes and Fees | Configuring sales taxes and other cart fees. |
| Saving Customer Information | Reading and writing customer information. |
| Accounting Data | Managing account records. |
| Collecting Payments | Processing credits cards as order payments. |