Most online stores need to collect some form of payment. One exception might be a store that allows online ordering but requires in-person pickup of the purchased goods. In order to accept credit cards online your business will need to establish an account with a payment gateway provider.
PCI Compliance
The Payment Card Industry Data Security Standards (PCI DSS) imposes certain requirements on websites that collect credit card information. This basically involves ongoing validation of your site to monitor for vulnerabilities that could result in data being compromised. You will need to run scanners that test your site for all known exploits and correct any issues that are identified. Depending on the size of your site and the number of vulnerabilities identified it can take anywhere from a couple of hours to a few days or even longer to review the scanner results and implement corrections. This process needs to be repeated at designated intervals. The frequency at which tests are mandated depends on the nature of your site and the information stored on your servers. Generally these test must be run either annually, semi-annually or quarterly.
The tests you are required to run depend on the information you collect and save. For this reason you should avoid saving sensitive information unless this is absolutely necessary.
Although this process can seem arduous, it is generally a good idea to check your site for vulnerabilities on a routine basis irrespective of whether you collect sensitive data since this will help make your site less likely to be compromised.
The other aspect of the PCI compliance involves self assessment questionnaires. Sample questions include "do you take backups?", "are backups run on a schedule?", "do workstations have antivirus software installed?", "are the antivirus programs kept up to date?", etc. The questionnaires need to be answered once a year.
Payment Solutions
There are two main approaches for accepting credit card payments:
- Interfacing with pages hosted by your credit card provider.
- Hosting your own credit card entry forms.
Provider Hosted Solutions
With provider hosted solutions you don't actually collect any credit card information directly. Instead, your site links to a page that is hosted by your credit card provider or a payment processor, such as PayPal. The customer enters their credit card details directly on the provider's website and once the payment has completed the provider page redirects back to your website. Typically, with this option you post information to the provider's site which tells it the URL to be redirected to upon a successful payment and a second URL to be launched if the user abandons the payment process without actually paying.
The main advantage of choosing a provider-hosted solution is that, when doing so, your site is not subjected to the PCI compliance requirements described above. This compliance is unnecessary since, in a provider-hosted solution, you (as the merchant) never have access to the credit card details entered by your customers so it would be impossible for hackers to steal this information even if your site is breached.
The main disadvantages to provider hosted solutions include the following:
- Often the checkout process is less streamlined since the customer must navigate away from your site to complete the payment process. This problem can be mitigated to some extent if your provider offers an iframe solution. In such a case, the form is still being hosted on the provider's site but, since it appears within a frame of your site, your users may not even be aware that they are entering their credit card details on a different site.
- It is generally easier to spoof the payment process with this type of solution. As mentioned, a common technique is to provide a callback URL to be launched after a successful payment. This URL is generally exposed within the HTML of the page so hackers can easily post back to this page programmatically in order to "trick" the page into assuming that a payment has been made. Be wary of integrating with any provider that does not offer solutions to prevent this simple hack or, at the very least, sign into your payment provider's portal to make sure a payment was received prior to shipping any products ordered online.
PayPal is currently the only provider hosted solution with built-in support in the GenHelm framework.
PayPal
PayPal is likely the most convenient solution to implement since accepting payments through PayPal does not require your site to be validated for PCI compliance. One of the downsides of PayPal is that they do not reimburse merchants for fees collected when sales are reversed. In other words, when you make a sale and the user pays via PayPal, PayPal charges you fees to handle the payment. These fees are generally 3 - 4% or the sale amount. If you are out of stock on the purchased item or the customer changes their mind and you issue a refund to the customer, PayPal refunds the customer in full but also retains the fees you paid them to process the original transaction. If you are in a business that involves a lot of returns, these fees (for which there is no offsetting sales margin) can quickly kill your profitability.
If you decide to integrate with PayPay it is important to inform your customers that they do not require a PayPal account in order to pay. This is because PayPal can accept direct credit card payment from users who decide not to create a PayPal account.
Some studies have shown that sites which accept PayPal convert better than sites that do not. This is most likely because PayPal makes it pretty easy for customers to perform charge backs by claiming that goods or services did not meet their expectations.
Other Provider Hosted Solutions
It is generally pretty easy to integrate with most provider hosted solutions so don't shy away from implementing a custom solution to integrate with a hosted solution offered by your bank.
On Site Hosted Solutions
As mentioned, if you plan to implement an on-site hosted solution your site will be subject to ongoing PCI compliance validation and attestation. We recommend that you avoid saving credit card information on your site unless this is absolutely necessary. Even if your site is completely hardened to handle all known vulnerabilities you will still tend to be exposed to more threats by hackers if they know your site stores information that might be of value. Also, when you store credit card information on your site, you are subjected to an additional set of PCI compliance regulations that you could otherwise avoid.
The GenHelm framework offers built-in support for the payment gateways described below.
Authorize.net
Authorize.net can be used to accept US Dollar denominated credit card transactions.
Payflow Pro Payment Gateway
Payflow Pro can be used to accept credit card payments in Canadian, Australian and New Zealand Dollars.
Stripe
Stripe offers credit card transactions in a number of currencies and countries. Like PayPal, Stripe also feels they are entitled to keep the fees on refunds and returns.
If you want to use a Payment Gateway other than the ones described above, you can refer to the supplied gateways as examples to help you build your own components to interface with the Payment Gateway you wish to use.
Configuring Payment Options and Providers
Most of the code used to handle payments is part of GenHelm's generic framework defined in the system pseudo site. This code generally won't need to be changed regardless of which payment provider you choose. Since this code needs certain information, such as keys and passwords associated with your credit card provider account, config files are needed to supply information to the GenHelm framework. One of the uses of the php_array_data model is to set up these configuration files. Since the resulting config "files" are actually implemented as PHP classes, this makes it very easy and efficient to access the config settings. Separate information can be supplied for your sandbox and production environments. You also have the option to encrypt this information to make it more difficult to discern if your PHP code is ever compromised.
The number and names of the required configuration files depends on which payment providers your site needs to support. All of the configuration files are stored within the subfolder invoice_admin so that you can easily see which config files you have defined.
Required Configurations
All supplied payment options make use of config data stored in invoice_admin/payment_config. Here we show an example of such a config file.
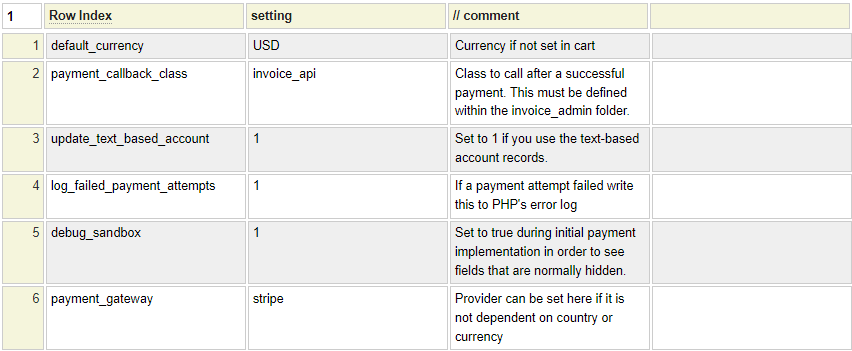
Let's review the settings defined within this config file.
default_currency
In most cases, the currency you charge will depend on the currency setting that has been configured in your cart object. If all of your transactions are expressed in a single currency you can set this currency in your payment_config file in case this has not been set at the cart level.
payment_callback_class
Often you will want to perform certain automated processing whenever a payment occurs. For example, you might alert your production department of a new order. This special processing should be defined in a class that is stored within your site's classes/invoice_admin folder. If a payment_callback_class is set, the process_payment method of this class will be called regardless of how the payment was made.
The callback class is normally the same invoice_api class that integrates with the invoice dashboard page.
update_text_based_account
By default, the GenHelm framework manages accounting data within text files. To make use of this feature, set this config setting to 1 (meaning true). If you have implemented an alternate solution for keeping track of payments, you can set this option to 0.
log_failed_payment_attempts
This option controls whether unsuccessful payment attempts should be written to PHP's error log.
debug_sandbox
Accepting credit card payments involves a lot of complex code and interaction between various components. In some cases you don't have a lot if visibility as to what is happening behind the scenes. While you are implementing your payment solution it is a good idea to enable this debug option (by setting it to 1). This will show hidden values and provide other debugging features to help identify problems and expedite your implementation. Once you have payments and callbacks working as expected you can disable this feature so that the sandbox screens appear as they will in production.
payment_gateway
If you only plan on implementing one credit card payment provider you can set this here, within the payment_config definition. Sometimes, the provider you use will depending on your customer's country or the currency of payment. In that case you should not include the payment_gateway in the payment_config file.
Creating the payment_config File
To create the payment_config file described above follow these steps:
- Use the command "e php_array_data" to launch the php_array_data model.
- Enter the command "example payment_config" to load a sample config file definition.
- Make any changes that are appropriate to you situation.
- Use the command "stow invoice_admin/payment_config" to stow your config file.
Configuring Payment Notifications
Some payment handlers, such as PayPal and Stripe, can notify your website when certain events (such as payments) are successfully completed. This is a much more reliable form of notice than simply redirecting the user to a page on your site since these Payment Notifications generally include handshaking designed to ensure that the request is not spoofed. Therefore, this is the point where you should process the payment and perform other actions, such as alerting your shipping department to process an order.
Since these Payment Notifications are handled in the background (by calling your server with a new request) it can be difficult to debug and validate these notices. For this reason, the GenHelm framework provides features to help you confirm that these notifications are firing and functioning as expected.
If you don't plan to support PayPal or Stripe, or if you are not implementing support for an alternate payment provider that supports event notification you can skip this configuration. If you are using one of these providers follow these steps to create the necessary config file.
- Use the command "e php_array_data" to launch the php_array_data model.
- Enter the command "example payment_notifier_config" to load an example of this config file.
- Make any required changes.
- Use the command "stow invoice_admin/payment_notifier_config" to stow the config file.
Here is an example of what the config definition should contain. Notice that you can config your sandbox environment and your live site independently.
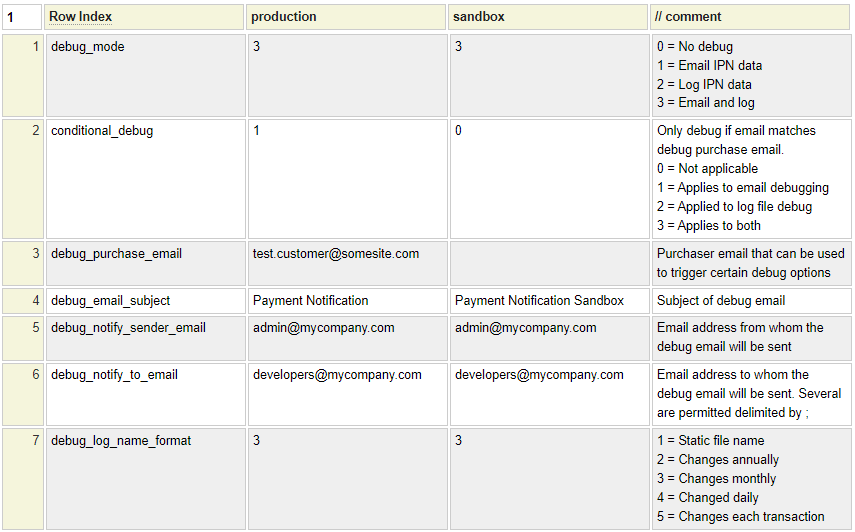
Let's review these config settings next. Notice that the last column heading begins with //. This is used to define columns within the php_array_data model that are to be designated as comments.
debug_mode
Set this to one of the following values to trigger debug notifications:
- To send an email for each Provider Notification event.
- To write each notification to a log file in your site's data folder.
- To do both, send an email and write to a log file.
It is a good idea to write a log file, even in production, so that your developers can refer to this log in the event of any problems with your site's payment handling.
conditional_debug
This allows you to test your site by placing an order using a certain "test customer" email address and only generating logging for this specific customer email. Set this option to 1 to limit debug emails to payments associated with a specific email address. Set this to 2 to limit log file writing to events associated with a specific email address. Use 3 to limit both of these options so that they only apply for test orders using the specified email address.
debug_purchase_email
If conditional_debug is not 0, you must provide this email address that will activate logging.
debug_email_subject
If you are sending debug emails, enter the subject to be used for these emails.
debug_notify_sender_email
If you have elected to send email logs, enter the email address that will be used as the sender of these emails.
default_notify_to_email
If you have elected to send email logs, enter the email address of the user to whom these emails should be sent. You can send these to several users by supplying a list of addresses delimited by semi-colons as in user1@example.com;user2@example.com;user3@example.com.
debug_log_name_format
When writing event notification log files you can decide on the frequency with which new logs should be created. If you choose option 1, only one log file will be used and this will be saved directly within your site's data folder. For all other options, the files will be saved within the data/[provider-name]_notifications folder.
- Create only one file named [provider-name]_notifier_log.txt.
- Create a new file every year named [provider-name]_yyyy.txt
- Create a new file every month named [provider-name]_yyyymm.txt
- Create a new file every day named [provider-name]_yyyymmdd.txt
- Create a new file for every transaction named [provider-name]_yyyymmdd_hhiissttt.txt
Where yyyy is the current year, mm is the current month, dd is the current day of the month, hh is the current hour, ii is the current minute, ss is the current second and ttt is the current thousandths of a second. The option you choose will generally depend on your sales volume. For example, if you only have a few payments per day, you can likely just create a new log file every year but if your site has hundreds of payments per day then a daily log might be the best option.
Collecting Payments
Typically, the first screen your online customers will see after completing an order will be something like the one shown below.
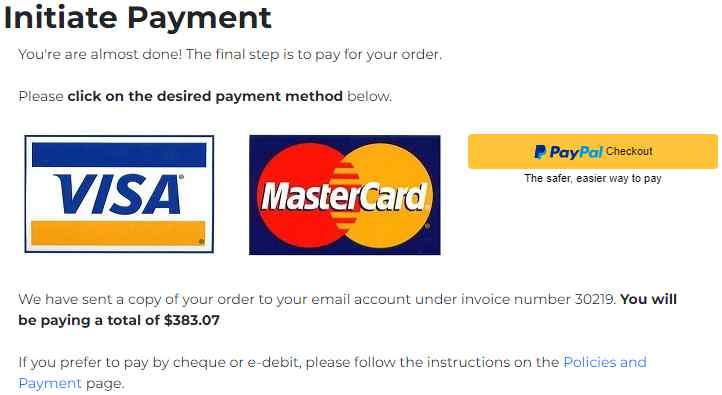
In this help we will show how to build this screen as well as a separate Stripe payment screen.
Rendering the Payment Checkout Links
One of the supplied framework classes is called cart_select_pay_method. This class resides in the text_cart folder of the shared system pseudo site. Since this class needs to be configured with details about the customer and the amount to be paid, you will need to define a site-specific class to call the framework class. One method of calling site-specific classes to render nested page content is to use the $sss function (which stands for server side script). As you can see in the bootgrid model specification below, we call a server side script routine twice, once to generate the credit card icons on the left and then once again to generate the PayPal icon. The second parameter passed in the dollar function identifies the class method that will be called. You can also see that various dollar functions are used to dynamically build content. For example, this same form is used from a separate bill-payment form so we adjust the text based on where this page will be used.
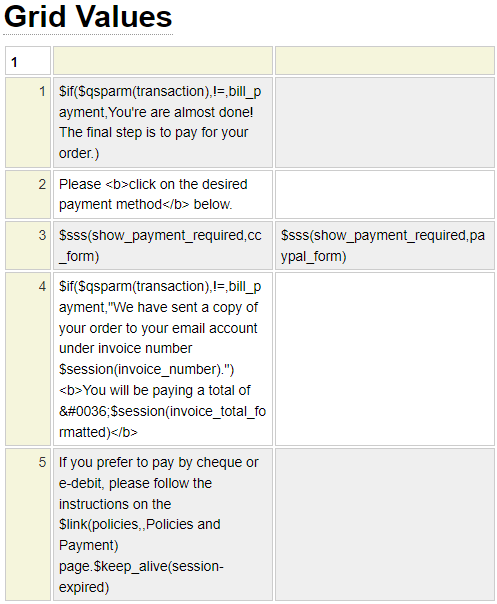
To use the code above as a starting template, launch the bootgrid model and enter the command example initiate-payment.
Next we will review the show_payment_required class. Since this class is used by the $sss function we need to inherit sss_base_class as shown:

Here we see the code used by the show_payment_required class. You can load this sample code by launching the php_class editor and entering the command "example show_payment_required".
function cc_form() {
  	// Generate image of Visa/Mastercard with link to payment form
	return $this->generate_link('cc');
}
function paypal_form() {
	// Generate PayPal checkout button with associated script
	return $this->generate_link('paypal');
}
Function generate_link($method) {
  $this->site->start_session();  // Make sure session is active
  $payform = $this->site->create_object('cart_select_pay_method','',false,'text_cart');
  $payform->set_cc_banner_imageid('my-logo'); // Optional image_id to show on payment form

  // Most values will come from the session. You could also get amounts from the cart object
  $payform->set_payor_name($_SESSION['first_name'],$_SESSION['last_name']);
  $payform->set_amount($_SESSION['invoice_total'],$_SESSION['invoice_currency']);
  if (!empty($_SESSION['taxes'])) {
      $payform->set_tax_amount($_SESSION['taxes']);
  }
  $payform->set_phone($_SESSION['phone']);

  // Tell the framework what page to go to after successful or cancelled payment
  $payform->set_completed_cancelled('payment-acknowledged',  // Page to go to after successful payment
                                  'payment-cancelled');  // Page to go to if user cancels payment
  $payform->set_purchase_description($_SESSION['invoice_description']);
  $payform->set_billing_address($_SESSION['billing_address'],
                                $_SESSION['billing_city'],
                                $_SESSION['billing_state_or_province'],
                                $_SESSION['billing_zip_code'],
                                $_SESSION['billing_country']);
  $payform->set_customer_email($_SESSION['email']);  // Customer email

  // Optionally set the layout to be used by internal credit card form
  // $payform->set_credit_card_form_layout('nomenu');

  // This can be used to pass optional values to your callback routine.
  // Use whatever keys and values you want however length is restricted.
  $payform->set_metadata(array('color'=>$_SESSION['color'],'weight'=>$_SESSION['weight']));

  // Pass the invoices if known
  if (isset($_SESSION['invoices_paid'])) {
      $use_invoices = $_SESSION['invoices_paid'];
  }
  elseif (isset($_SESSION['invoice_number'])) {
      $use_invoices = $_SESSION['invoice_number'];
  }
  else {
      $use_invoices = '';
  }
  $payform->set_invoices($use_invoices);

  // Generate the form
  $paypal = ($method == 'paypal');
  return $payform->generate_payment_link($paypal);
}
Viewing the Form Fields
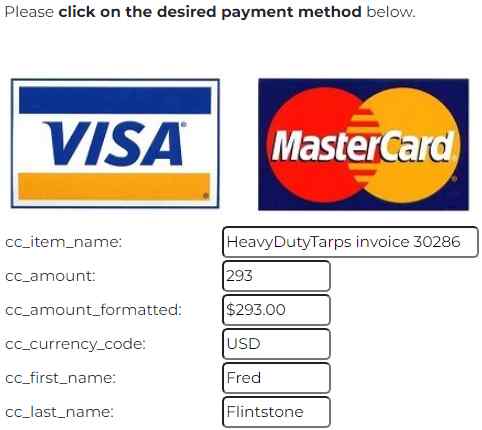
The credit card icons used to launch the payment form are part of a hidden form that is used to pass information to the payment page. If you have enabled the debug_sandbox option in your payment_config file the fields that are normally hidden will be shown on this form. This makes it easier for you, the developer, to verify that the correct information is being sent to the payment form. Here we show a snippet of this form with debug enabled.
Changing the Credit Card Graphic
The default graphic used to launch the payment form shows Visa and Mastercard only. If your payment provider supports other cards you can change this graphic in one of two ways:
- Define an image on your site named credit-card-graphic.
- Call the set_credit_card_pay_graphic method (of the cart_select_pay_method class) to assign an alternate image_id for this graphic.
Normally these definitions should include a small mobile version and a larger desktop version.
Calling the show_payment_required Class
Since $sss(show_payment_required) is referenced twice on the initiate-payment bootgrid definition the code shown above will be called twice. The second parameter to the function indicates the method to be called. Since most of code is the same whether you are building the credit card link or the PayPal link we call a common function called generate_link in each case. Of course, if you only want to accept direct Credit Card payments or only PayPal payments you won't call the show_payment_required class twice.
Accepting PayPal Payments
Please follow this link to learn how to accept PayPal payments.
Accepting Direct Credit Card Payments
Every payment gateway offers a distinct set of APIs and methods for interacting with their system. The GenHelm framework standardizes this to a great extent so that the code you write is not tightly coupled to a specific provider. Generally speaking there are two different implementations used by payment gateway providers:
- Server Based Solutions
- Client Based Solutions
Server Based Solutions
With most server-based solutions, the form used by the customer to enter their credit card information is hosted on your website. You present this form to your customer and, on your server, you call the credit card provider to validate the user's card details. GenHelm provides built-in support for the following two server base providers:
- Authorize.net
- Payflow Pro
If you want to use a different server-based provider you will need to implement a new class that the framework can call as we describe below.
Client Based Solutions
With client based providers, often the form to interact with the provider is created dynamically using JavaScript code supplied by your provider. The method by which you incorporate support for a new client-based provider will vary for each provider. GenHelm includes built-in support for Stripe and this code can be used as an example for how you can implement support for your provider.
Working With Server Based Solutions
If you only support one server based credit card provider you can identify the name of this provider using the payment_gateway row of your payment_config file.
In some cases you may need to interface with multiple providers. For example, in Canada it is common to use Authorize.net for USD denominated transactions (or US based credit cards) and Payflow Pro for Canadian Dollar transactions. To tell the framework which provider should handle the payment you must use the php_class model to implement a class named invoice_admin/determine_payment_gateway. This class should contain a static function such as the following:
static function get_payment_gateway_class($currency,$country_code,$environment) {
// currency and 2-digit country code are passed in upper case. Environment can be production or sanbdbox

//	if ($environment !== 'production') {
//		return 'test_gateway'; // Use this for preliminary testing
//	}

  if ($currency === 'CAD') {
  	return 'payflow_pro'; // Canadian Dollar Payments
  }
  else {
  	return 'authorize_dot_net'; // US Dollar Payments
  }
}
The name of the provider refers to a class within the classes/paymentgateway folder. Normally these are stored within the system pseudo site so that they can be called by any website. If you are implementing a provider that will only be used by one website you can also define this class within the site's classes/paymentgateway folder.
If you are just setting up your website, it is a good idea to use the test payment class named test_gateway. This will always return true (successful payment) provided the expiry date is in the future and the expiry month is greater than 5. If the expiry month is less than or equal to 5 it will return false (payment failed). You can use this to confirm that payments are being recorded correctly and errors are being handled without having to contact an actual provider. Once this is working you can update the determine_payment_gateway class to return a functional provider. Most providers offer a sandbox which will allow you to perform additional testing without actually processing any payments.
If you are implementing a new provider class you will create a PHP class which extends paymentgateway/payment_common from system as shown:

Your class will have access to all of the properties of this base class which we show here:
namespace system;
require_once CLASS_PATH.'standard_base.php';
class payment_common extends \standard_base
{
protected $address; // Street address
protected $amount; // Payment amount
protected $auth_code; // Authorization code if returned by processor
protected $cc_number; // Credit card number
protected $city; // Address city
protected $company = ''; // Company name
protected $config_object; // Provider-specific config object
protected $country; // Address country
protected $csc; // Card Security Code
protected $currency; // Payment Currency
protected $customer_id; // Optional customer id
protected $description; // Optional order description
protected $email; // Customer email address
protected $environment; // sandbox or production
protected $expiry_mm; // Card expiry month
protected $expiry_yyyy; // Card expiry year
protected $first_name; // First name of cardholder
protected $invoice; // Invoice being paid. Multiple invoices are separated by /
protected $last_name; // Last name of cardholder
protected $maximum_digits = 19; // Maximum card number length
protected $message; // Message returned by provider
protected $metadata; // Keyed array of additional metadata
protected $minimum_digits = 13; // Minimum card number length
protected $postal_code; // Address postal code of zip
protected $provider; // Name of the provider
protected $site; // site object
protected $state; // Address State or Province
protected $trans_id; // Transaction Id Returned from provider
Some of these fields, such as customer_id are optional so they won't be set unless you supplied a value when calling the cart_select_pay_method class.
The new payment gateway class must implement a method named process_payment. This method will interface with your provider's web portal (API) to execute a payment and ascertain whether the payment was successful. It should return true for successful payments and false for unsuccessful payment attempts. Failed attempts should normally include a message if one is supplied by your provider.
Here we see the code for the "test_gateway" that you can use to debug your payment processing before you implement an actual gateway. You can see the parameters that are returned from the process_payment method. For actual examples, please refer to the classes within the classes/system/paymentgateway folder.
function process_payment(& $message, & $auth_code, & $trans_id) {
	if ($this->expiry_mm < 6) {
		if ($this->expiry_mm == 1) {
			$_SESSION['cc_payment_attempts'] = 0; // Prevent test limits
		}
		$message = 'To test a successful payment use an expiry month that is greater than 05';
		return false;
	}
	$auth_code = 'testauth'.time();
	$trans_id = 'testtran'.time();
    return true;
}
If your payment provider does not return an authorization code or transaction id, you may leave one or both of these blank.
Normal users are only allowed 8 credit card payment attempts. This restriction is in place to prevent bots and hackers from programmatically calling your payment form using dubious card numbers in hope of identifying a card that has not been cancelled. If you use expiry month 1 when testing your payments, this will clear the counter so that you are not hampered by this limit during your testing. Obviously, your gateways should never clear this session variable.
If your provider supplies test credit card numbers that will validate in their sandbox environment you can optionally return some of these by implementing a method named get_test_cc_number as shown here:
function get_test_cc_number() {
	$cc = array('4007000000027','4012888818888','4111111111111111','5424000000000015','2223000010309703');
	return $cc[random_int(0,sizeof($cc) - 1)];
}
If such a method is defined, your sandbox environment will include a Set Test Number link that your testers can use to assign a suitable test card number as shown below:
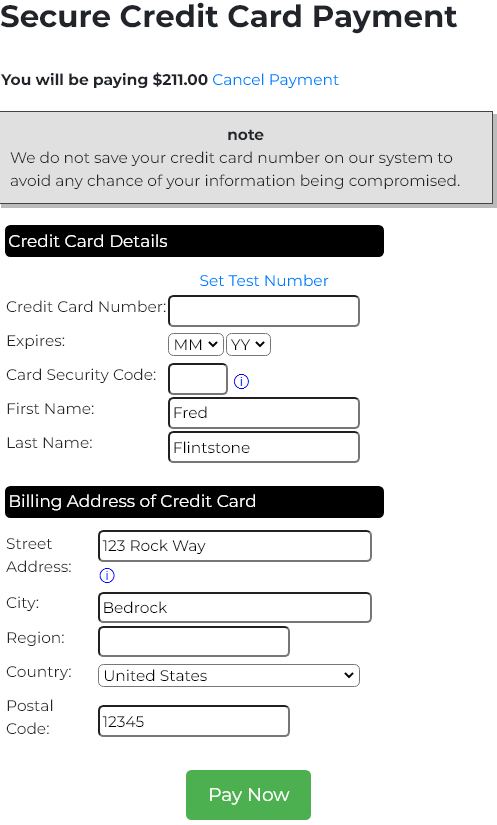
This credit card payment form is defined in system so that it can be used by any website. This is available in several different languages. If your desired language is not supported you can add new languages by updating the translate specification named credit_card_form (in system).
Configuring Your Providers
The supplied code is designed to be used without change. Nevertheless, this code requires certain codes and passwords that you must supply so that the generic payment gateway classes work with your payment accounts. The necessary information is supplied to the framework by coding it within a php_array_data class. Separate information can be supplied for your sandbox and production environments. You also have the option to encrypt this information to make it more difficult to discern if it gets compromised.
Encrypting Information
Information can be encrypted by invoking the help for the $encrypt function (enter this function in a cell and place your cursor on the function and type <cntl>g). This will pop up the help for the encrypt function as shown:
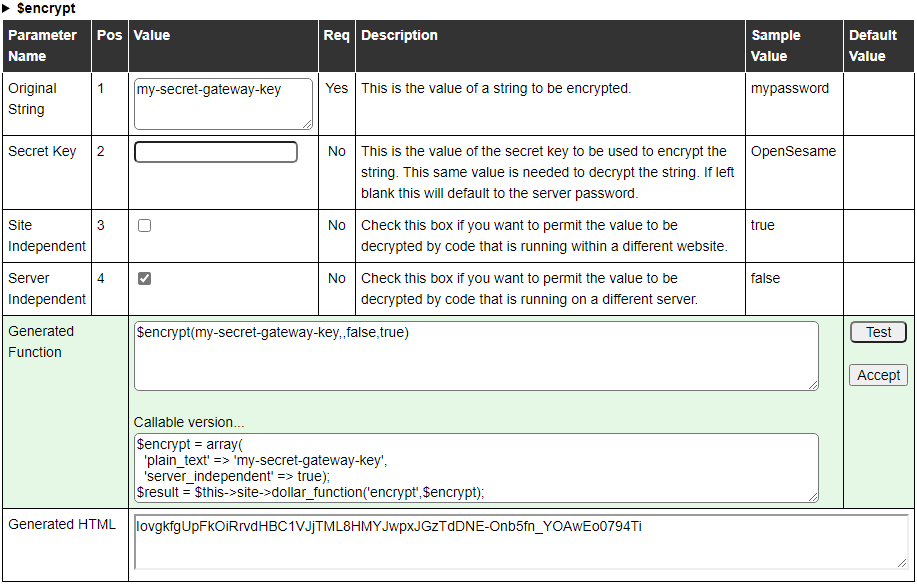
If you are using this function within the sandbox environment but generating encrypted values that will be used within your production environment, you must select the Server Independent option. Otherwise, your encrypted values will fail to be decrypted when executing within your production website.
Configuring Authorize.Net
Here we show an example the php_array_data definition that you must supply to configure authorize.net.

This must be saved under the name authorize_dot_net_config. You can load this example by launching the php_array_data model and entering the command example authorize_dot_net_config. Obviously you will need to change the codes to the values supplied to you by authorize.net. You don't need to encrypt the merchant_transaction_key value however this is recommended as an extra security measure.
Configuring Payflow Pro
Payflow Pro configuration is supplied by creating a php_array_data definition named payflow_pro_config. This will appear something like the following:

You can create this config file by launching the php_array_data model and entering the command example payflow_pro_config. If the user name is blank or missing, this defaults to the login_id as per the Payflow Pro protocol.
Cancel
If the user decides to cancel the payment process, the payment page will link to the page that was designated as the cancel page when calling the cart_select_pay_method class' set_completed_cancelled method. To see a sample page to be used for cancelled requests invoke the tabs model and enter the command example payment-cancelled.
Complete Payment
If the user completes their payment, the payment page will redirect to the page you designated as your completed payment page. Often this page will thank the customer for completing their purchase and release any resources that are no longer required in the user's session. It is important to note that it is very easy for hackers to navigate to this "payment completed" page without actually making a payment. Therefore, you should never perform any processing or business logic within this page that assumes that a payment has been made. Instead, any such processing must go in the class indicated by the payment_callback_class set within your payment_config definition.
To obtain a sample payment acknowledgement page edit the tags model and enter the command example payment-acknowledged.
Payment Callback
When the payment_callback_class is set, the specified class will be called for each successful payment. Internally, a call is made to the standard system class named process_payment. If you are using text-based accounting files, this class automatically updates the customer's account file to apply the payment. If this is successful a call is made to the site-specific callback class. The behavior of this class will depend on your site's requirements. For example, it might send a payment confirmation email to your customer or shipping department or it might write to a payment log.
If you are implementing a database oriented solution you can copy the supplied process_payment specification from system to your site. If you are implementing a text based accounting solution you can keep the existing process_payment in system and supplement its behavior by adding a callback class.
Generally, this same class will be hooked into the supplied order admin functions so that the same code is used to process payments irrespective of where or how the payments occur.
Your callback class should reside within your site's classes/invoice_admin folder and should include a function named process_payment which accepts the following parameters.
- Payment Amount
- Payment Currency
- Invoices (a single invoice is passed as a scalar, multiple invoices are passed as an array)
- The Payment Method
- Optional associative array of additional parameters such as the payment_fee, auth_code and trans_id
If your callback class defines a method named set_metadata, this will be called while passing a keyed array that originated in the code that instantiates the cart_select_pay_method. To see an example of this callback class, please launch the php_class model and enter the command example invoice_api.
Stripe Payments
Follow this link to learn how to incorporate Stripe payments into your site.
Ecommerce Help Index
| E-Commerce Overview | Features and components used to build an online store. |
| Cart Items | Defining products and services. |
| Shopping Cart | Interacting with a shopping cart. |
| Working with Text Files | How to store and process transactional data using text files. |
| Working with Databases | Saving and retrieving database table data. |
| Transaction Numbers | Generating identifiers for invoices and other transactions. |
| Taxes and Fees | Configuring sales taxes and other cart fees. |
| Saving Customer Information | Reading and writing customer information. |
| Accounting Data | Managing account records. |
| Collecting Payments | Processing credits cards as order payments. |