This help is for users who maintain a site's database-oriented blog pages. This could be a site owner or subject matter expert, or it could be a web developer or content writer. Before you can perform blog maintenance, you must first set up the blog database.
Make sure the database is loaded into your environment and running before proceeding with these steps to define topics, categories and posts. Generally speaking, you should have at least three or four posts prepared before launching your blog. Otherwise, users will perceive that the website (blog) is incomplete or under development.
All of the pages described below are defined within the system pseudo site. This means that they are available to all of your websites without explicitly defining them at the site level.
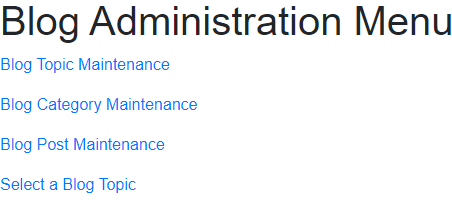
The blog administrative functions should be accessed using the page blogadmin/menu of the site whose blog you wish to maintain. This will present the following menu:

Begin by selecting the first link, Blog Topic Maintenance. This will present the page named blogadmin/edit-site:
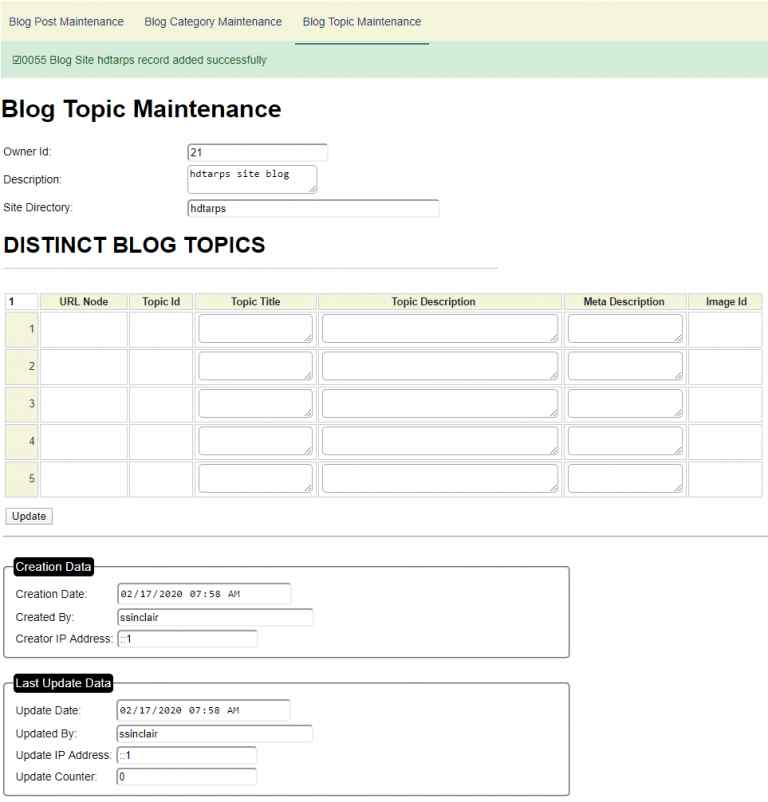
If this is the first time you have visited this page, a blog_site record will be stored automatically. In order to define posts you must first define one or more blog topics. This function would normally be performed by your web development staff, as opposed to your end users.
Topics are very high-level subject areas. Generally speaking, topics are not changed very often. We will see later that topics can be broken down into categories.
Here we have defined two topics:

Notice that column 1 specifies a url node. All of the blog posts are stored with a url structure such as:
http://www.example.com/post/sometopic/post-summary
Consider a site that deals with fitness. Such a site might want to separate blog posts into two topic areas:
If you don't foresee the need to have more than one blog topic for your site, you could just name the topic "blog" or choose a short word that is specific to your business. On the other hand, if you think you might want to specialize your blog posts into different major topics you should give your first topic a name that is more specific than just blog.
Try to keep the URL nodes as short as possible. The url node associated with a topic should not be changed after posts have been created. If a change is necessary, you should update your .htaccess file to redirect all of the posts within the topic.
The Topic Id is an output-only field. This will be populated once you have stored your topics.
If you are presenting your users with a list of topics from which to select, the topic title will be used as the link to posts within this topic.
The topic description provides more information about what the posts within the topic are about.
The supplied meta description will be added to posts within the designated topic.
Enter the id of the image to be shown next to the topic.
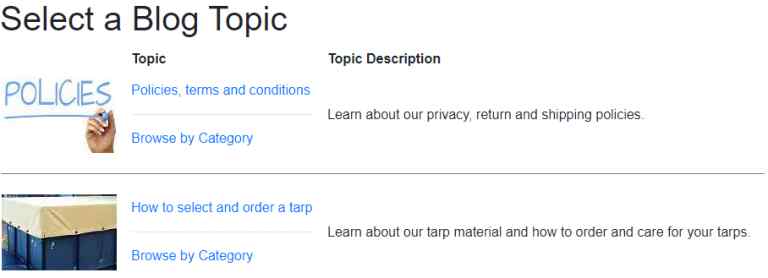
The system program blog-browse-topics can be used to allow your users to choose from the available blog topics or you can create a custom page for this purpose. Here is a sample of this page's output using the definitions shown above.
After defining your overall topics, the next step is to define categories within each topic. Categories allow your users to focus on subject areas they are most interested in.
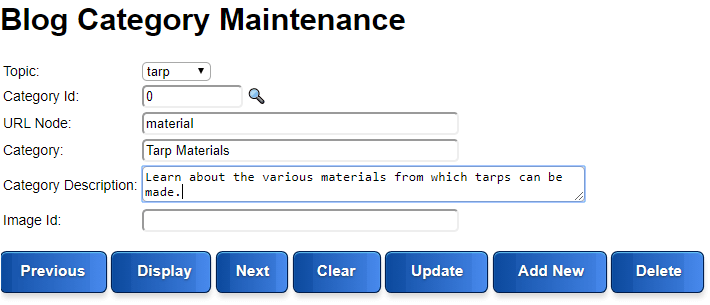
When adding categories, the category Id is not entered, this will be generated automatically. The URL node is used when showing a list of posts for the category, the length of the url node should be kept short and may not contain blanks or special characters. The URL node must be unique for each category within a given topic and should not be changed once posts have been added using the category. Avoid adding categories until you are ready to create posts which refer to the category. Otherwise, users who select the category will be disappointed to find there are no posts available within the selected category.
The image id is optional. This is used to show an image next to the category to help users ascertain the purpose of the category.
Continue to add as many categories as you require for the initial set of posts that you are planning to create. Click the Add New button after entering the details of each category.
The blog posts are the main pages/articles of your blog(s). These are maintained using the follow WYSIWYG editor.
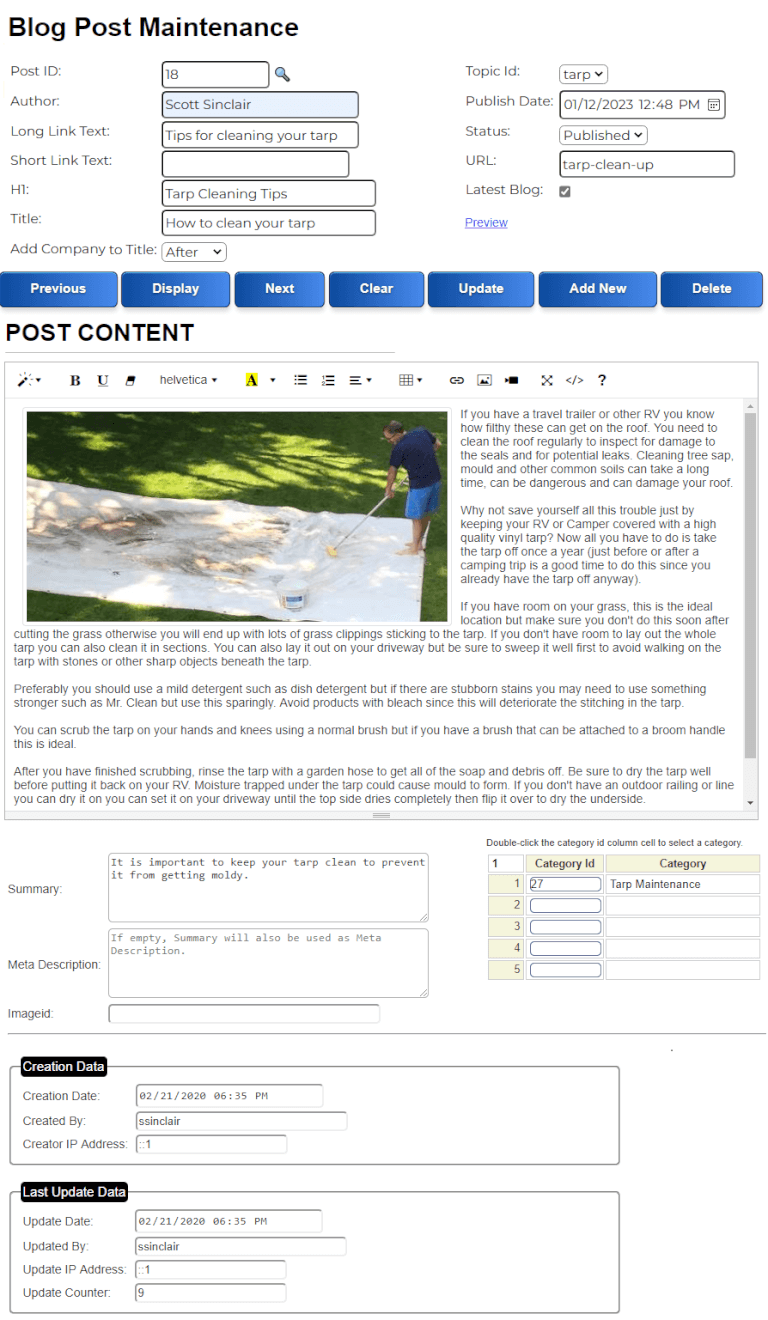
Let's review the key fields associated with a blog post.
The Post Id is generated automatically when saving a post. To change an existing post you can use the magnifying glass to search for the id of the post you want to change.
Select the topic Id of the topic under which the new post will reside. Each post can only belong to one topic.
If you want to show the author at the top of the post, enter the author details to be shown.
Enter the date to be associated with this post. The system allows articles to be post-dated. In such a case, the article will not appear on the website until the specified date/time has been reached. This is useful for posting future-dated press releases. For example, if you wish to "release" your post say tomorrow at 8:00 AM. Just enter this date and time and set the status to Published. You won't be able to see the post on the website until the specified date/time but you can use the Preview link to review the post before the general public can see it.
Only posts in the published status will be shown on the website. The other statuses can be used to create posts that are not yet ready to be published. Note that future-dated posts should be assigned a status of Published (not Pending) if you want them to appear on the specified publish date.
When a post is shown, the page also shows links to the previous and next posts. Use the long link value to indicate what the link text for the current post should be when it is linked to from the next or previous post.
Some lists of posts may use a shorter version of the link. Enter this here.
This flag is used to indicate whether the current post should appear under the list of latest posts shown by components generated using the latest_blog_posts model. If the current post is not very interesting or important you can leave this unchecked. For most posts, this should be checked.
All blog post URLs take the form www.example.com/post/some-topic/some-url-snippet. In the url field, enter the last portion to appear in the url. Generally, this should be as short as possible while being as descriptive as possible. This cannot contain blanks or special characters with the exception of a dashes.
This is the title that will be assigned to the post. The title is not actually shown on the page but is used internally within the HTML of the page. It is very important for Search Engine Optimization purposes to try to make this as descriptive as possible without being overly long. Depending on the field below, the title you enter here may be supplemented by information about your company contained within the site_settings definition.
Within the site_settings definition, you can enter a company name (or other information such as a product or city name) that can be appended to to the title. If the title entered above, is more than, say, 60 characters long. It is recommended that this option be set to "no" since the title is already quite long. If the title you entered above is fairly short, feel free to select before or after to supplement the title with your company name information.
The post content is entered in this WYSIWYG (What You See Is What You Get) editor. Due to styling differences between the editor and your website, the post may, in fact, appear slightly differently when viewed on your website. Therefore it is a good idea to save the post with a pending status before publishing. That will allow you to preview the post on the live site (using the preview link) before others can view the post.
Occasionally, the characters <, > or & may cause certain text within your blog to be interpreted as HTML. To prevent this, we recommend using the following special strings to represent these characters:
| To Render | Enter |
| < | |
| > | |
| & |
The summary text is show in lists that show which posts are available for viewing.
The meta description is used internally on the page to provide a suggestion to search engines regarding what the post is about. If your leave this summary blank, it will default to the summary text.
Use this field to associate an image with your post. These images must be predefined in your sandbox environment.
Each post can belong to one or more categories that are linked to the topic under which the post is stored. Categories must be defined in advance so if you don't see a category that fits your post, open a new browser tab and create a new category associated with the topic for which you want to create a post. You can also leave the category designation empty and add a category later once you have created a few posts that fit the category.
This section provides information about who first saved the post.
This section provides information about who last modified the post.
There are three primary methods by which you can add images to your post.
These options are described in the following sections.
In order to paste an image, you first have to copy an image to the clipboard. If you are on a Windows PC, you can use the Windows Snipping Tool to select and paste an image. You could also open a drawing tool such as Paint on Windows or Paintbrush on the Mac and use this to open an image and select a portion of the image to copy it to the clipboard.
Position your cursor to the location within the WYSIWYG editor where you want the image to appear and then use Ctrl+V (or Cmd+V on a Mac) to paste the image. When pasting images in this manner, by default, the images are stored as a data "blob" directly within the blog post. It is generally poor practice to keep these images as blobs within the blog because this prevents browsers from caching the images and it can slow down your pages and undermine SEO. If your images are very small, there could be a performance benefit to keeping these as blobs but in most cases you will want to convert these blobs to saved images. GenHelm supports a feature that makes this easy to do, we will describe this next.
To convert your blob into an image, begin by clicking on the image. You will see an overlay graphic like the one shown here.

We will be using the pencil icon but make note that this same toolbar can be used to float the image to the left or the right. This would be used if you want your text to flow beside your image.
Click on the pencil icon on the left to edit the properties of the image. This will pop up a window like the following:
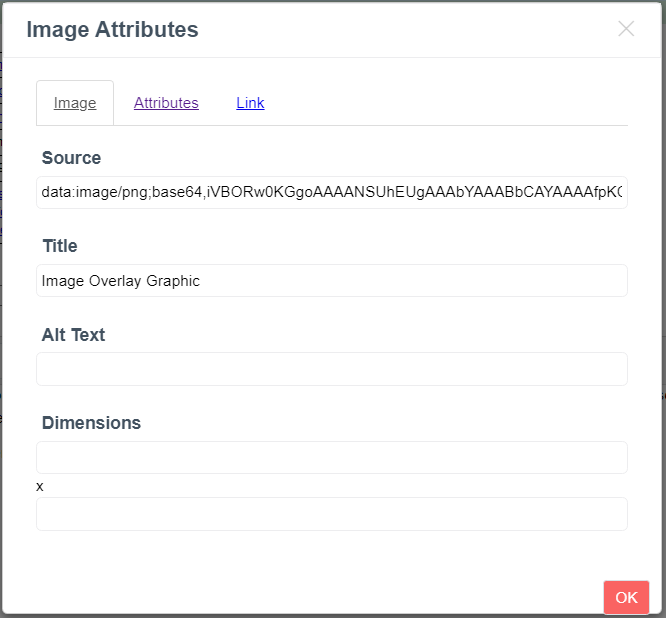
You can tell that this is a blob image because the Source field refers to the image beginning with data:image. On the first tab, enter a suitable title for your image. The title will also be used as the alt value or you can enter a different alt value if you wish.
Navigate to the Attributes tab. This will present the screen shown below:
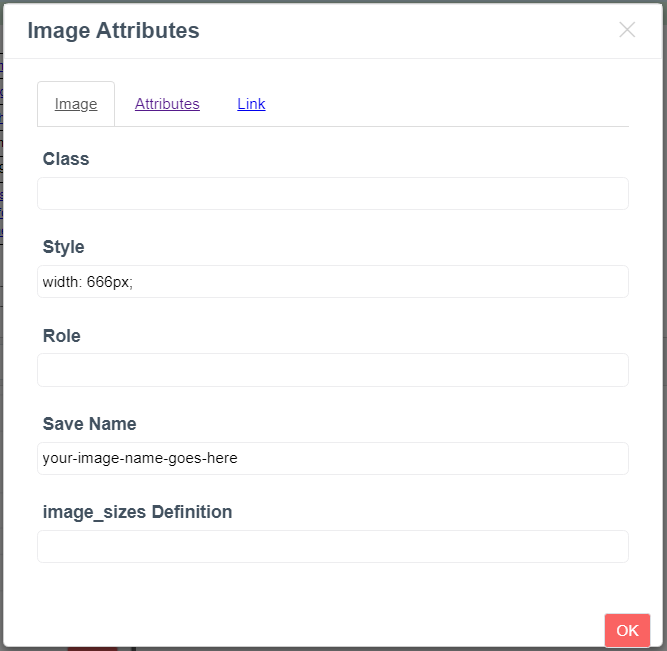
Use this tab to name the image to be saved. Generally, your image names should contain descriptive lower-case words separated by a dash character. If you have created an image_sizes definition, you can also refer to this on this page. Click OK when finished.
If you want your image to link to a page, you can use the link tab for this purpose.
When you update or insert the blog post, this image will automatically be saved within your site's images/blog folder. If you want to store the image within a subfolder of this, you can prefix your image name with a path. For example, if you enter a Save Name of help/overview. The image overview.png will be saved in the folder images/blog/help.
If the image you want to include in your blog is saved on your current PC or Mac, you can upload it to your blog. To do so, begin by clicking in the editor at the location where you want the image to be inserted then click on the image icon in the toolbar as shown here:
![]()
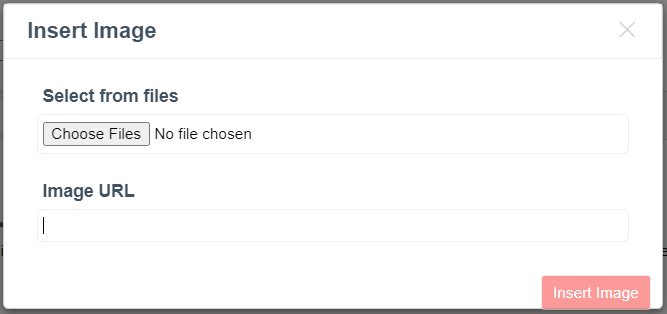
This will present a form, as shown below, where you can click on the Choose Files button and navigate to an image file to be uploaded.
Once your image appears in the editor, follow the steps shown in the Pasting Images section (above) to give your image a suitable name and title.
Notice the form above allows you to specify the URL of an image to link to from your blog. It is poor form, and generally illegal, to link to images hosted on other sites, but you can use this method to link to an image that has been uploaded to your site's images folder.
As you have learned, images can be created by the wysiwyg editor by converting pasted images into saved images. Since the number and size of images often plays a significant role in the performance of web pages it is important to be cognizant of the size of images you are rendering. Size has two connotations in this context:
These are somewhat related in that images that are visually large tend to take up more disk space and vise-versa. Nevertheless, there are techniques that can be applied to reduce the disk size of images without degrading the visual appearance of the images. By shrinking the disk size of your images, the pages that render these images will load faster and these pages will use less bandwidth on your server.
The recommended method for optimizing the disk size of images is to use the third-party tinify api. This can be done seamlessly by configuring GenHelm to call this API when generating images. To use this approach, begin by configuring the tinify API as outlined in the image model help. Once you have configured your tinify API key you must indicate that tinify should be used during wysiwyg editing. This is done by editing site_settings and adding the following configuration:

This setting applies to both the wysiwyg model and database driven blog editing using the function blogadmin/edit-posts.
There are a few minor downsides to using tinify to shrink images rather than the default image compression however these are generally offset by the benefits of improved image quality and performance. The main disadvantages to using tinify are:
If you don't want to use the tinify API, you can still use this setting to configure the quality of your images by entering a number from 1 to 100 in the Value column. Higher numbers should render higher quality images; however, these images will tend to be larger and result in slower page loads. The default value is 35 if this setting is not configured.
Note that it is possible to configure your site so that blog posts can be updated within your sandbox environment (for example prior to publishing your site). This is done by pointing to your production blog database from the sandbox environment. When using this feature, you should avoid posting blogs that contain images since the images will be physically stored within the sandbox and there is no mechanism to transfer these to your production server.
One potential work-around for this issue would involve pasting images into the post but keeping these as inline/embedded images. Later, one your site is published, you could then update the posts in production and assign the inline images a name so that they will be saved as separate image files.